A clear guide. From setup to sales.
Set up MicroPOS, add your products and start selling. Find illustrated steps for Android and Windows, from connecting your cash register to setting up SGR deposits and attribute templates.
57 sections available
sections foundsections available01About MicroPOS and compatibility
6 sections
1.1About MicroPOS
What is MicroPOS?
MicroPOS is a POS software solution for Android and Windows, designed for merchants who need a simple, fast, and mobile sales process.
The application runs on Windows computers and Android phones and tablets, and works with compatible fiscal devices. MicroPOS also runs on selected All-in-One fiscal devices that combine the POS interface, Android platform and fiscal functions in a single device.
MicroPOS is designed for fast sales processing, management of the product catalog, and communication with compatible fiscal devices.
The application can operate online or offline, depending on the configuration and the functionality used.
Who is MicroPOS for?
MicroPOS is suitable for:
- stores and points of sale;
- brick-and-mortar points of sale;
- mobile commercial activities;
- street vendors;
- merchants who need a POS solution on a phone or tablet;
- users who want a simple and fast POS solution;
- scenarios in which an All-in-One fiscal device is used.
What can you do with MicroPOS?
With MicroPOS, you can:
- manage the product master list;
- make sales;
- issue fiscal receipts;
- use multiple payment methods;
- communicate with compatible fiscal devices;
- generate AMEF fiscal reports;
generate MF (Fiscal Memory) report
generate sales reports; by products; by categories; by attributes
- perform cash deposit and withdrawal operations;
- view the receipt history;
- reprint issued receipts, in compatible configurations;
- use the application online or offline, depending on the configuration;
- use integrated payment solutions, where available.
1.2What MicroPOS does not do
MicroPOS is a solution dedicated to sales activities, product catalog management, and associated fiscal operations.
MicroPOS is not an accounting solution and does not perform accounting operations such as:
- preparation of trial balances;
- preparation of account ledgers;
- other operations specific to financial accounting.
For such extended functionalities, dedicated solutions are required, such as MicroERP.
1.3Platforms and equipment
Windows devices
MicroPOS runs on Windows computers with compatible fiscal devices. Check your cash register model and connection method before setup.
Android devices
MicroPOS is an Android application and can be used on:
- Android phones;
- Android tablets;
- compatible All-in-One POS equipment.
When using an Android device together with an external cash register, the architecture is:
Android device → MicroPOS → Fiscal device
Compatibility must be verified for the complete combination of the device, the Android version, MicroPOS, the cash register model, and the connection method.
The fact that an Android device is compatible with the application does not automatically mean that any fiscal device can be connected to it.
1.4Compatible cash registers
MicroPOS is compatible with fiscal devices from the Datecs, Daisy, Custom, Orgtech, Tremol, Partner, and Incotex ranges. The exact model, interface, and accessories must be verified for the configuration in use.
1.5All-in-One devices
MicroPOS can also be used on certain All-in-One fiscal devices, such as:
Datecs BlueCash 50;
Partner Touch Evo.
Beko X30TR
In the case of an All-in-One device, the Android platform, the POS interface, and the fiscal functionality are integrated into the same device.
In this configuration, it is not necessary to connect a separate external cash register when the equipment used has an integrated fiscal module and is properly configured.
The architecture is:
Integrated Android platform → MicroPOS → Integrated fiscal module
1.6Fiscal device communication
MicroPOS has integrated fiscal communication functionality.
For standard operation of MicroPOS, it is not necessary to configure a separate FiscalNet driver.
When using an external cash register, MicroPOS communicates directly with the fiscal device via the connection method configured for that model.
02Application setup
12 sections
2.1Before your first setup
Have your company details and fiscal device ready. Setup on Android and Windows follows the same main steps:
- company identification;
- configuration check;
- selecting the cash register;
- connecting the cash register;
- configuring the administrator user;
- product configuration;
- configuring payment methods;
- testing the sales flow.
2.2Initial setup
When you first open MicroPOS, it guides you through the initial setup.
The general flow is:
Company → Connection and cash register → Administrator → Products → Sales
The exact configuration may vary depending on the equipment and scenario used.
Follow the steps below. Select an image to enlarge it.
2.3Identifying your company
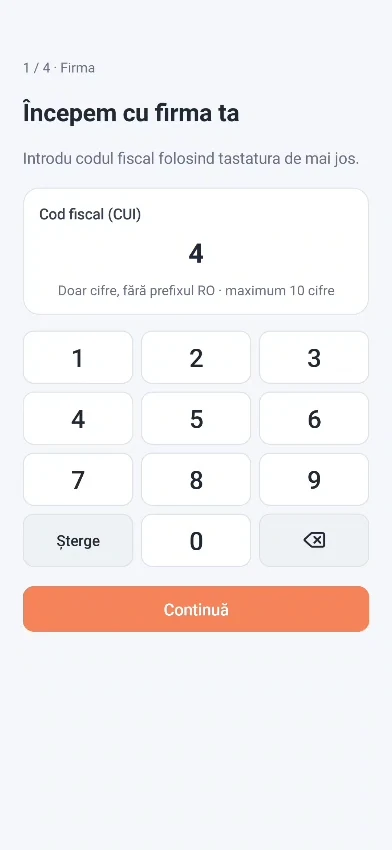
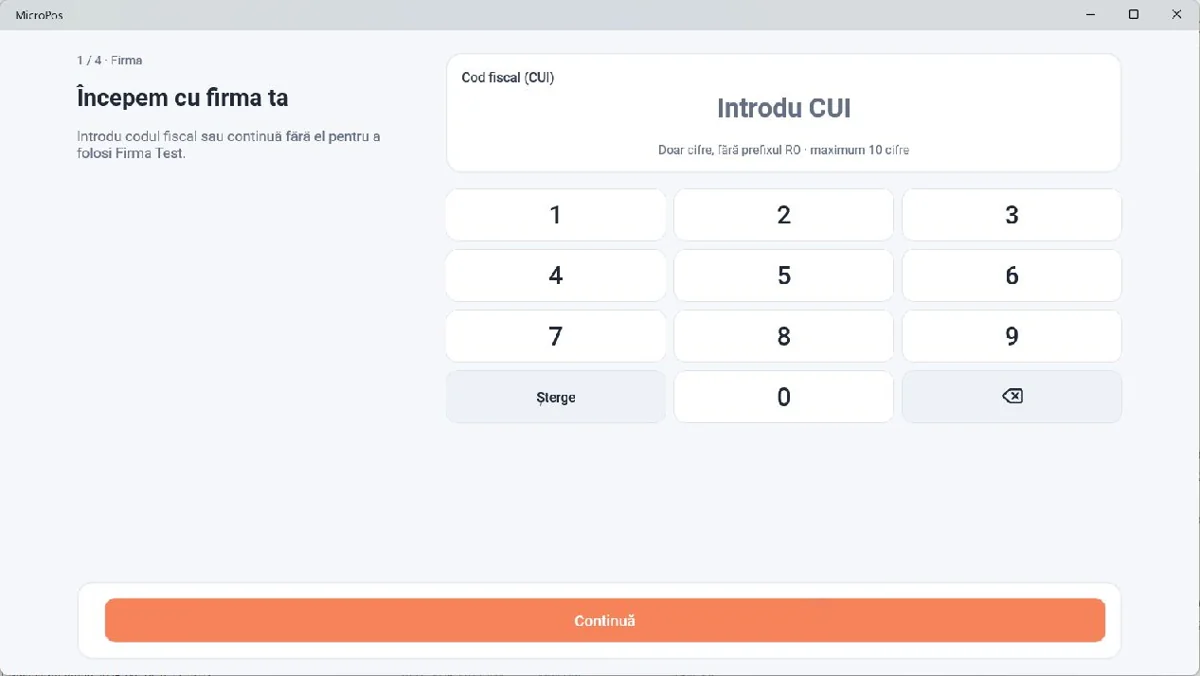
The “Let's start with your company” screen
During initial setup, MicroPOS requests the company's tax identification number.
The screen contains the field:
Tax ID (CUI)
The CUI can be entered using the numeric keypad displayed in the application.
Available elements
- field for CUI;
- numeric keypad;
- delete button;
- button for deleting the last digit;
- Continue button.
How to enter the CUI
- Enter the company's tax identification number.
- Check the value entered.
- Tap Continue.
MicroPOS verifies the company information.
Using the test company
MicroPOS also offers the option to use the application in test mode without entering a CUI.
To access the test company:
- Leave the Tax Identification Number (CUI) field blank.
- Tap Continue – without entering the CUI.
MicroPOS sets up a test company, which can be used to familiarize yourself with the application and to test the available functionalities.
2.4Checking company details
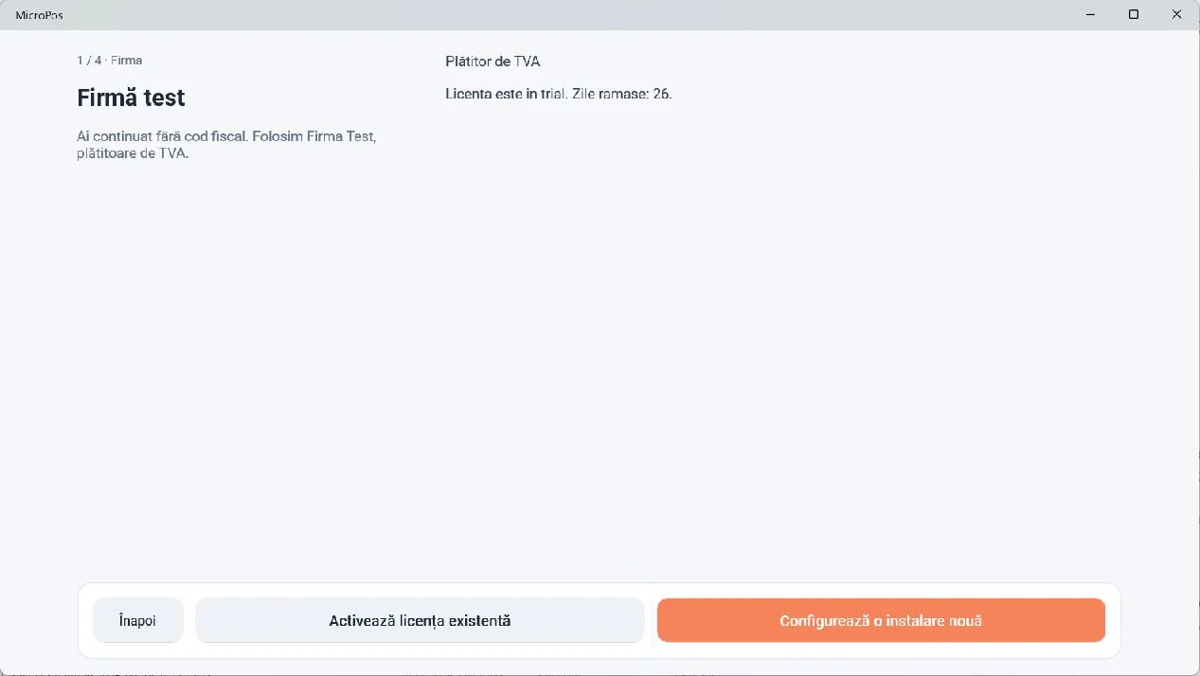
Windows: the Test Company screen offers “Activate an existing licence” and “Set up a new installation”. The illustrated demo uses the new installation option.
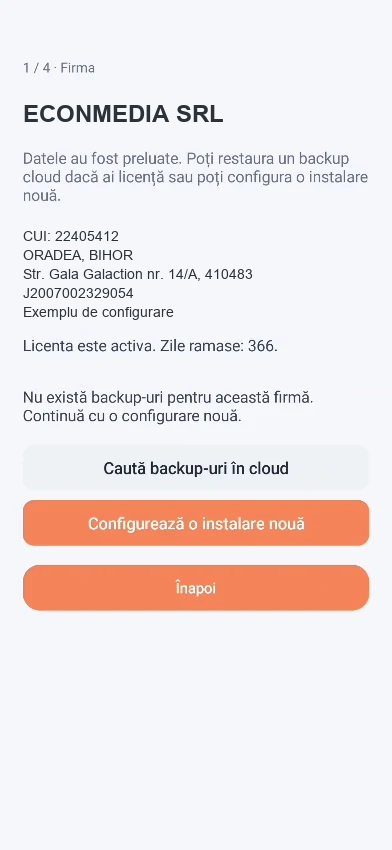
After entering the CUI, MicroPOS can display the information associated with the company.
Depending on the configuration, the following may be displayed:
- company name;
- tax identification number;
- company details;
- license information;
- license validity period.
At this stage, options such as the following may be available:
- searching for a cloud backup;
- configuring a new installation;
- returning to the previous step.
2.5Choosing the cash register
Connection method
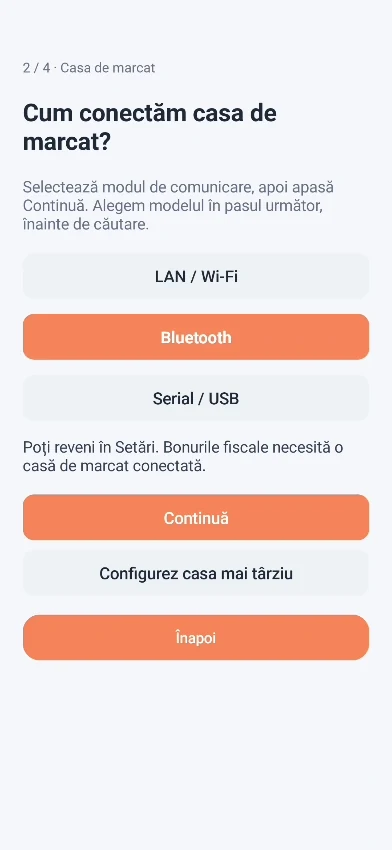
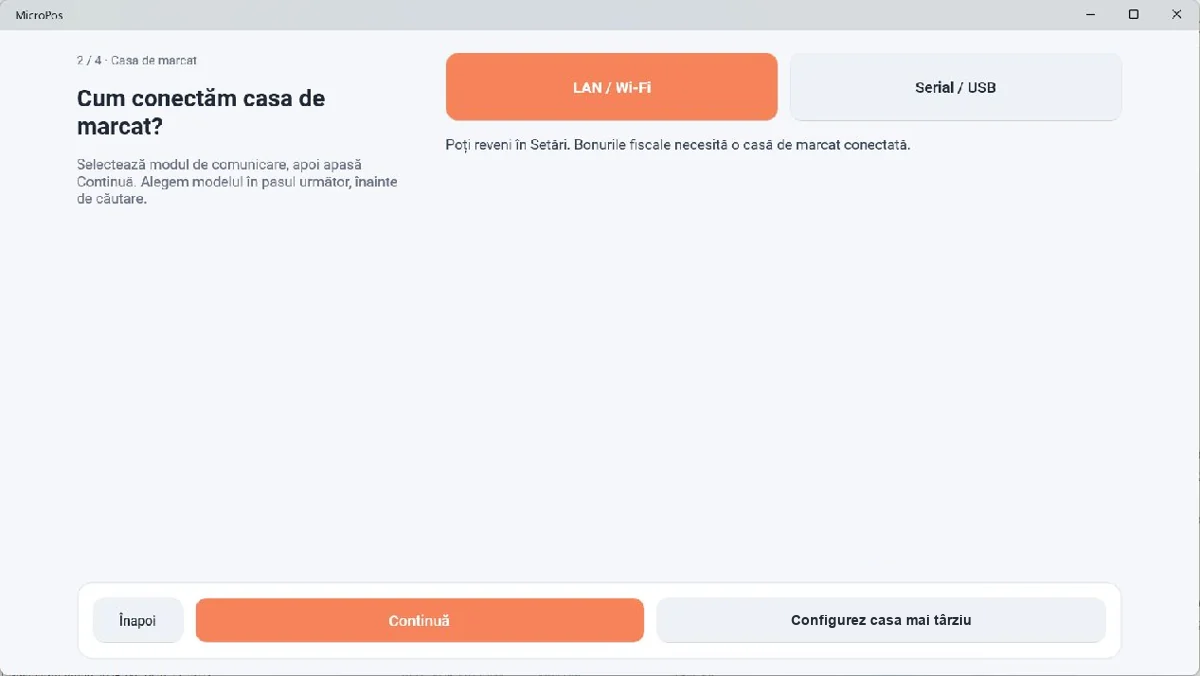
In the Android setup recording, the “How do we connect the cash register?” screen appears before model selection. It offers LAN / Wi-Fi, Bluetooth and Serial / USB.
Select the communication method supported by your device, then select Continue. The Android example uses Bluetooth. Windows offers LAN / Wi-Fi and Serial / USB. Select a method supported by your fiscal device; “Set up the cash register later” lets you continue without connecting it immediately.
The “Choose the cash register” screen
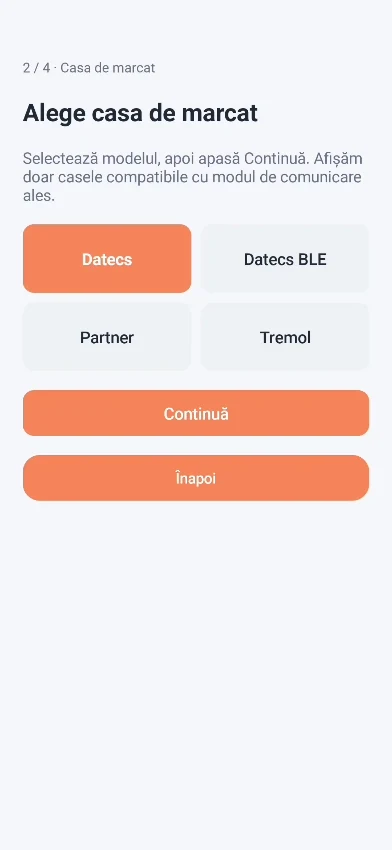
During initial setup, MicroPOS prompts you to select the fiscal device.
The application offers options for devices such as:
- Datecs;
- Datecs BLE;
- Partner;
- Tremol.
The list depends on the available configuration.
Choosing the cash register
- Identify the manufacturer/model corresponding to the equipment used.
- Select the appropriate option.
- Tap Continue.
It is important that the equipment selected in MicroPOS matches the equipment used in the actual configuration.
2.6Connecting the cash register
Windows: the connection is configured via LAN / Wi-Fi or Serial / USB, depending on the model. The Bluetooth steps below apply to Android. Confirm the fiscal device's settings and compatibility for your configuration.
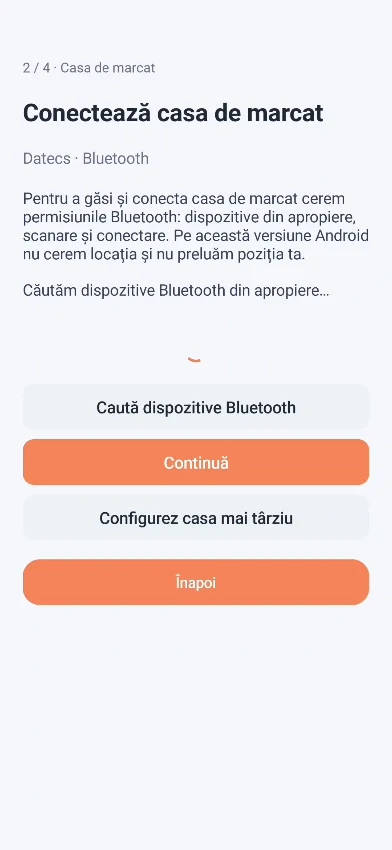
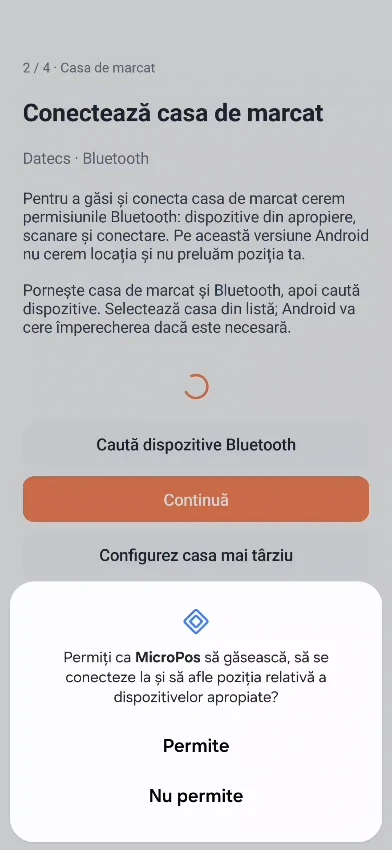
The “Connect the cash register” screen
Depending on the equipment used, MicroPOS can use Bluetooth to communicate with the cash register.
The screen may include:
Search for Bluetooth devices
Continue
Configure the cash register later
Back
2.7Bluetooth permission — Android
The first time you use the device search function, Android may request permission for MicroPOS to identify and connect to nearby devices.
To configure the cash register via Bluetooth:
- Allow the access requested by Android.
- Enable Bluetooth if it is not already enabled.
- Make sure the fiscal device is turned on.
- Continue setup in MicroPOS.
2.8Searching for Bluetooth devices — Android
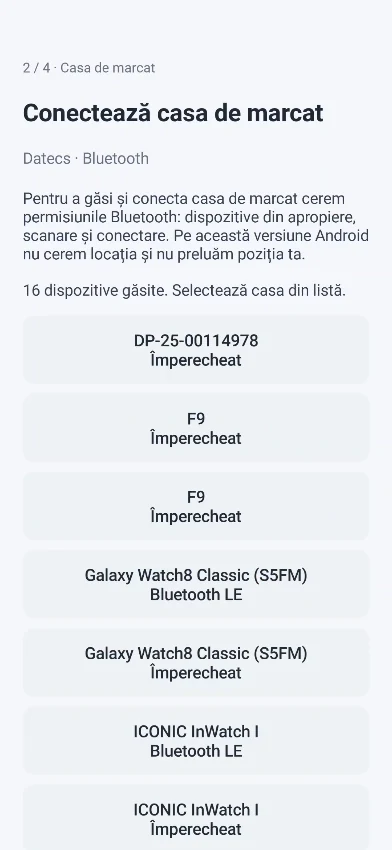
After permission is granted, MicroPOS can search for available Bluetooth devices nearby.
Procedure
- Turn on the cash register.
- Enable Bluetooth on your Android device.
- Tap Search for Bluetooth devices.
- Wait for the available devices to be displayed.
- Identify the fiscal device.
- Select the appropriate device.
- Complete the pairing if Android requests it.
- Continue setup in MicroPOS.
If the device is not displayed, check that it is turned on, that Bluetooth is enabled, and that the device is within communication range.
2.9Setting up the cash register later
MicroPOS also allows you to continue with the configuration without immediately connecting the cash register.
Option:
Configure the cash register later
can be used when:
- the fiscal device is not available during setup;
- the connection is to be made later;
- the application configuration must be continued before installing the fiscal device.
2.10Administrator configuration
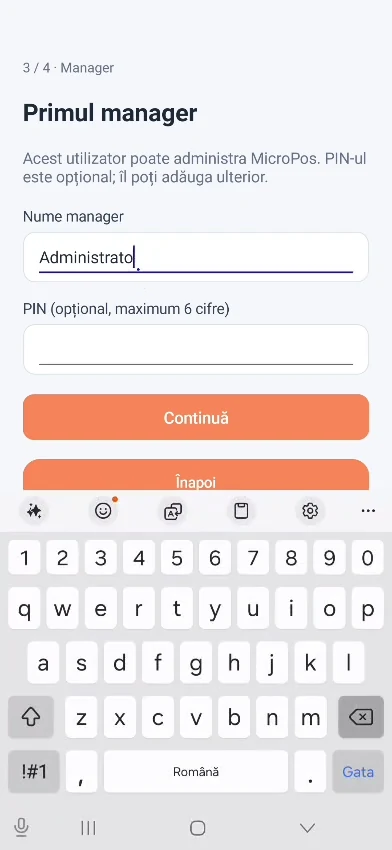
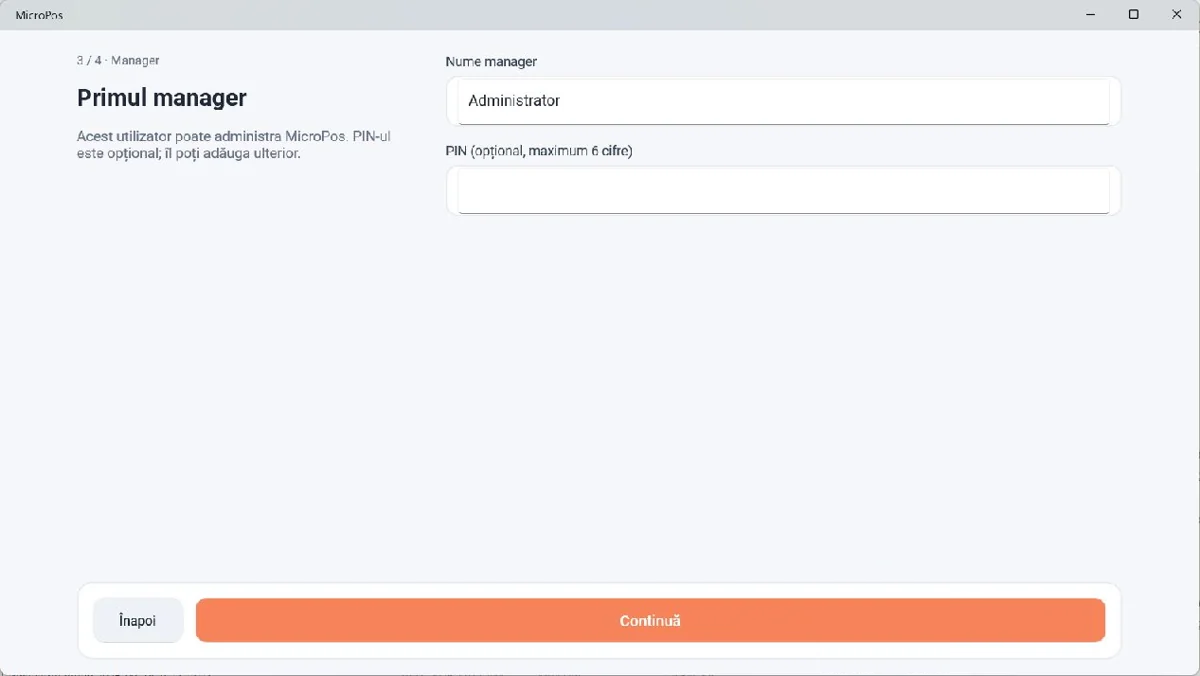
The “First manager” screen
During initial setup, MicroPOS requires the configuration of the first user with administrator rights.
The screen may contain:
Manager name
PIN
The application indicates that the PIN is optional and can be added later.
Administrator configuration
- Enter the manager's name.
- Enter the PIN if you want to use PIN authentication.
- Tap Continue.
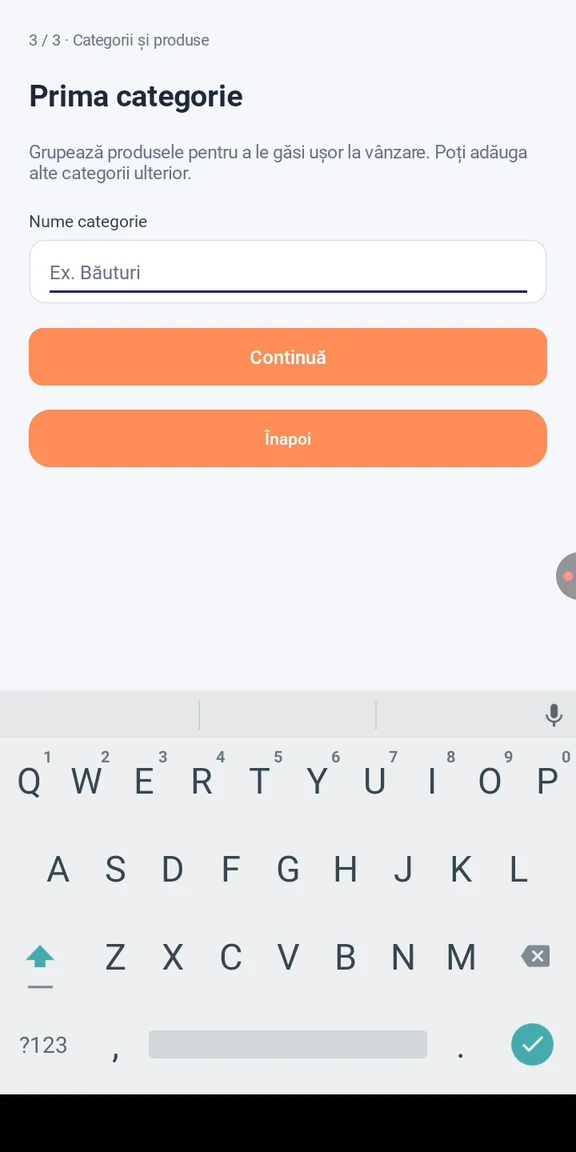
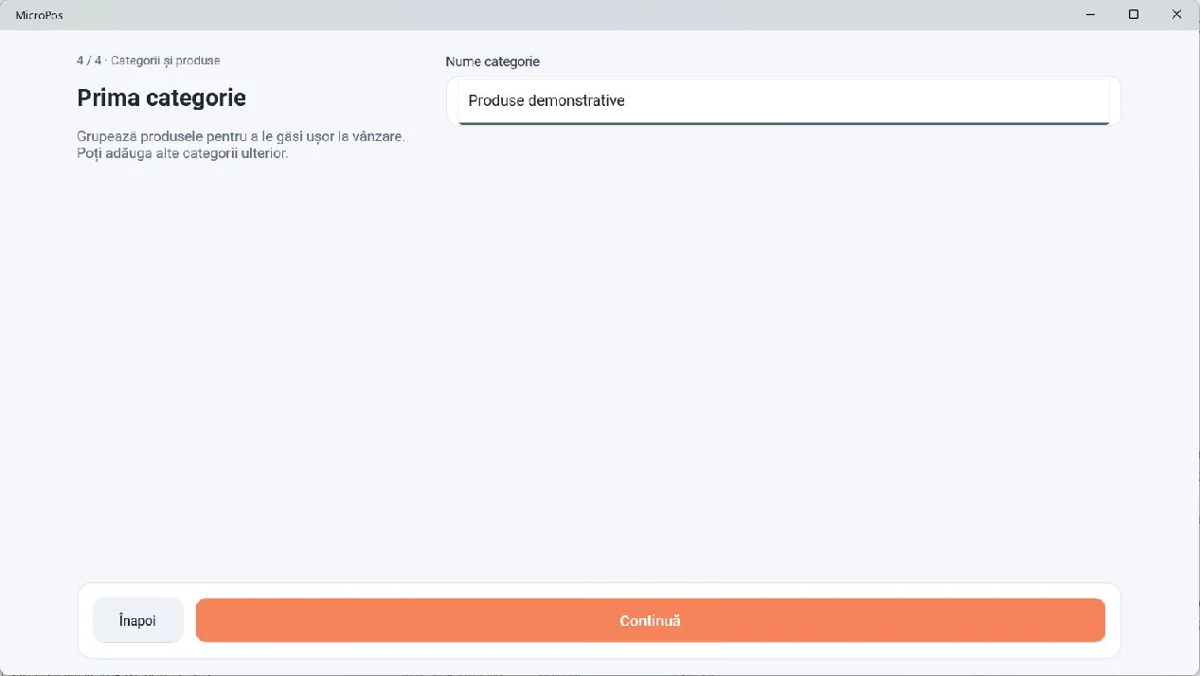
2.11Setting up the first category
MicroPOS allows products to be organized into categories.
During initial setup, you may be prompted to create the first category.
Creating the category
- Enter the category name.
- Tap Continue.
The category has been created and can be used for products in the product list.
Examples of categories:
- Beverages;
- Coffee;
- Food products;
- Miscellaneous products.
2.12Setting up the first product
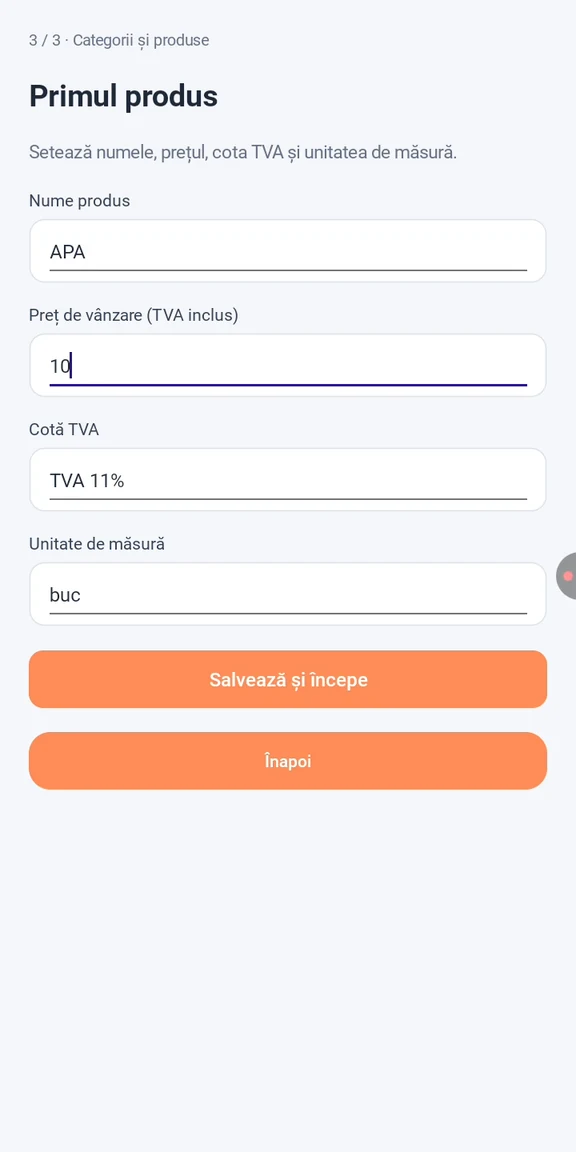
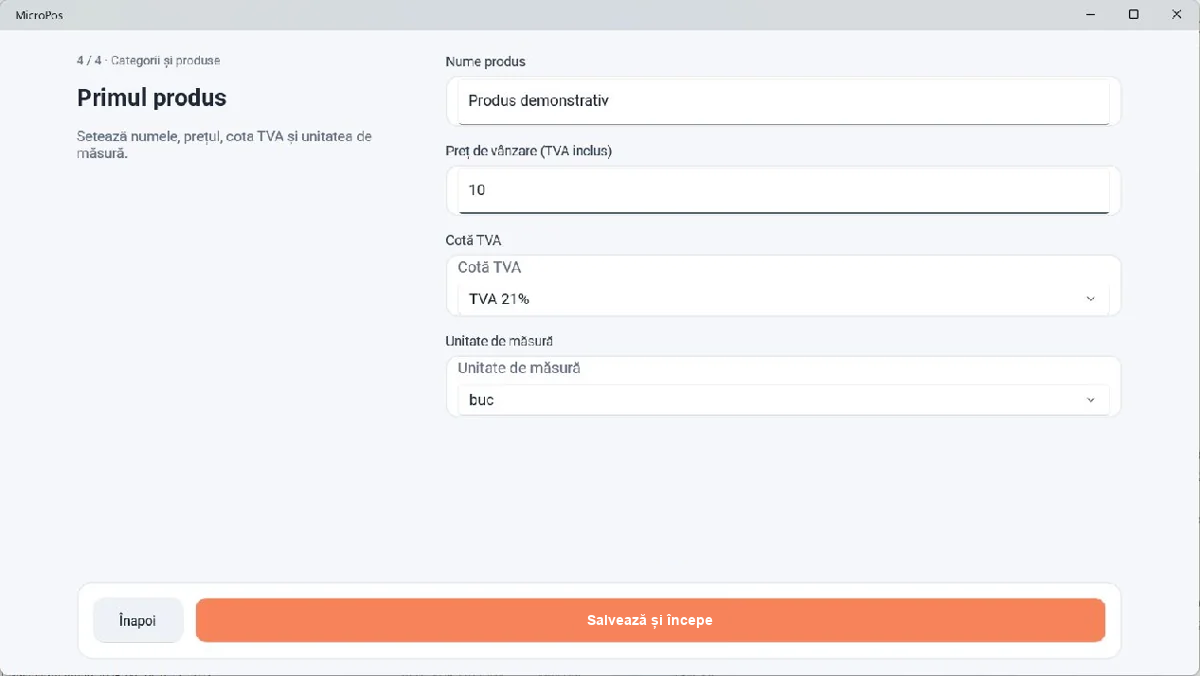
The “First product” screen
During the initial setup, you may be prompted to add the first product.
The available information includes:
Product Name
Sales price (VAT included)
VAT rate
Unit of measure
Product Name
Enter the product name that will be displayed in the product list and on the sales screen.
Price
Enter the product's sales price.
MicroPOS displays the price as:
Sales price (VAT included)
VAT rate
Select the VAT rate corresponding to the product.
The application offers options such as:
- VAT 21%;
- VAT 11%;
- VAT 0%.
The available rates may vary depending on the configuration.
Unit of measurement
Select the unit of measurement used for the product.
The example shown in the interface is:
pcs
Saving the product
After entering the data:
- Check the information entered.
- Tap Save and Start.
MicroPOS completes the initial configuration.
03Products, SGR and templates
6 sections
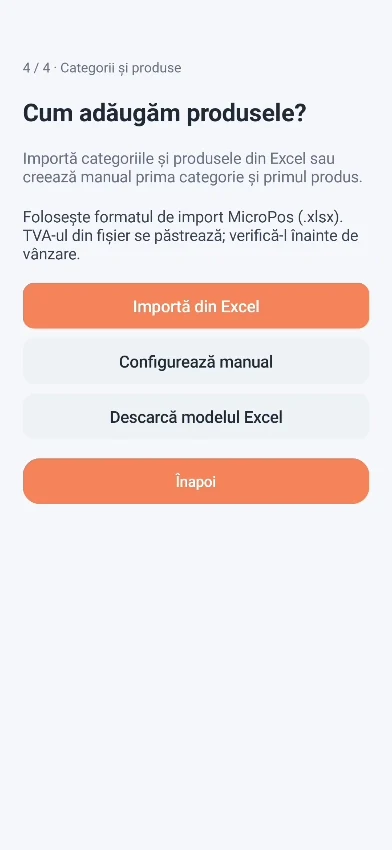
3.1Adding products
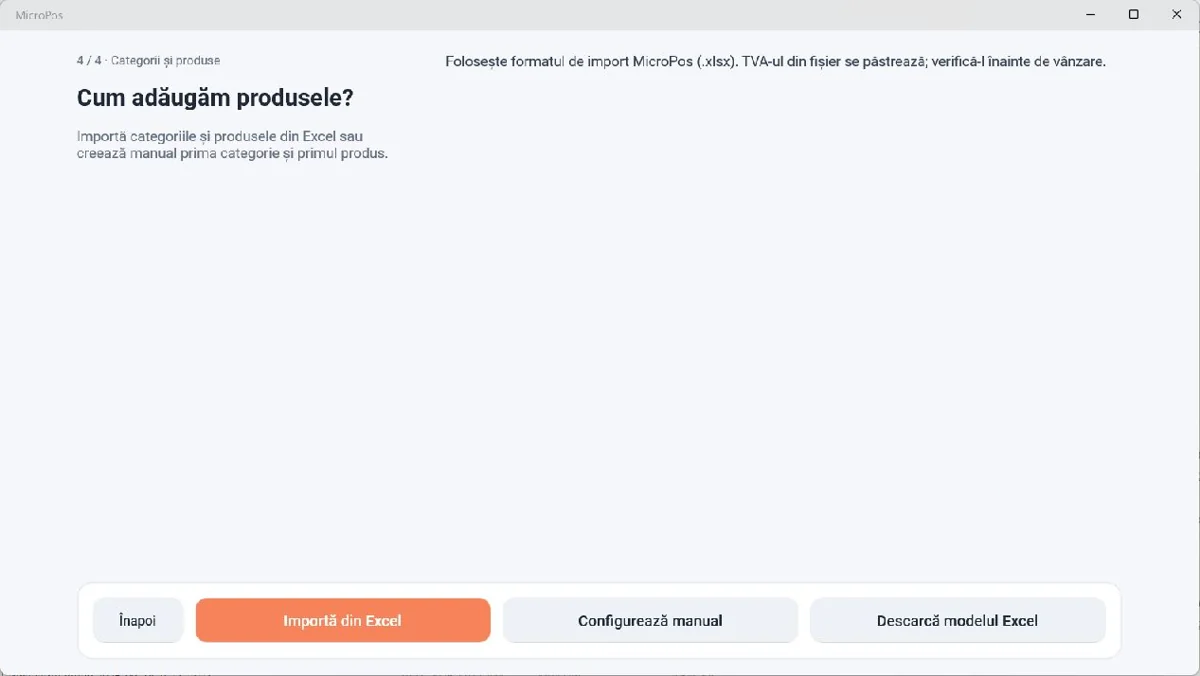
MicroPOS offers two main methods for configuring products:
import from Excel;
manual configuration.
The configuration screen may display the following options:
Import from Excel
Configure manually
Download the Excel template
Back
3.2Importing products from Excel
Importing from Excel enables faster configuration of a product list with a large number of products.
Downloading the Excel template
MicroPOS provides an Excel template that can be used to prepare products.
To prepare for the import:
Go to the Download Excel template option.
Save the file.
Fill in the product information.
Save the file.
Return to MicroPOS.
Select Import from Excel.
Select the prepared file.
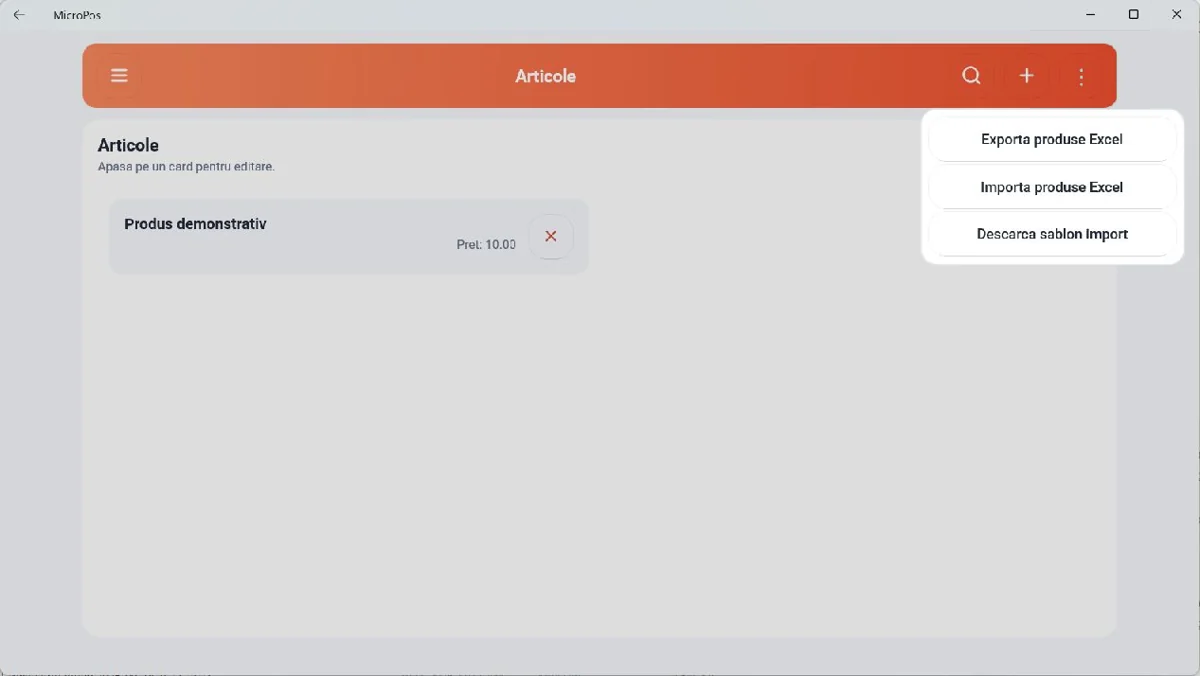
Windows: in the Items list, the three-dot menu offers Excel import, export and template download options.
3.3Completing the import
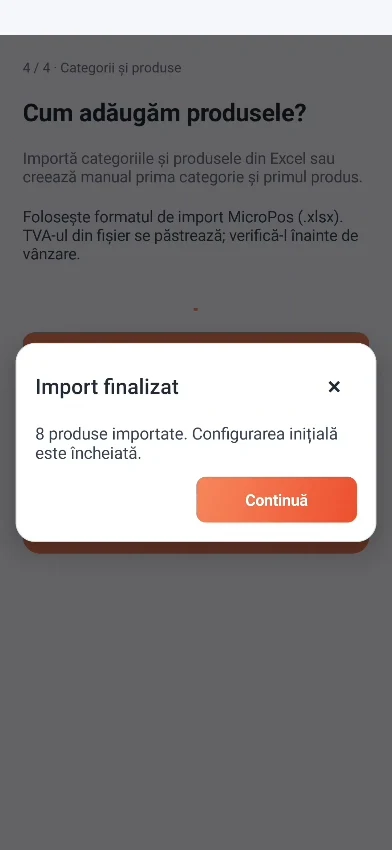
After selecting the file, MicroPOS processes the data.
Upon completion of the operation, a confirmation message of the following type may be displayed:
"Import completed"
The application can also display the number of imported products.
After the import, check the products in the product list and on the sales screen.
3.4Setting up products manually
Products can also be added individually, without using an Excel file.
For manual configuration:
Select the category.
Add the product.
Enter the product name.
Enter the sales price.
Select the VAT rate.
Select the unit of measurement.
Save the product.
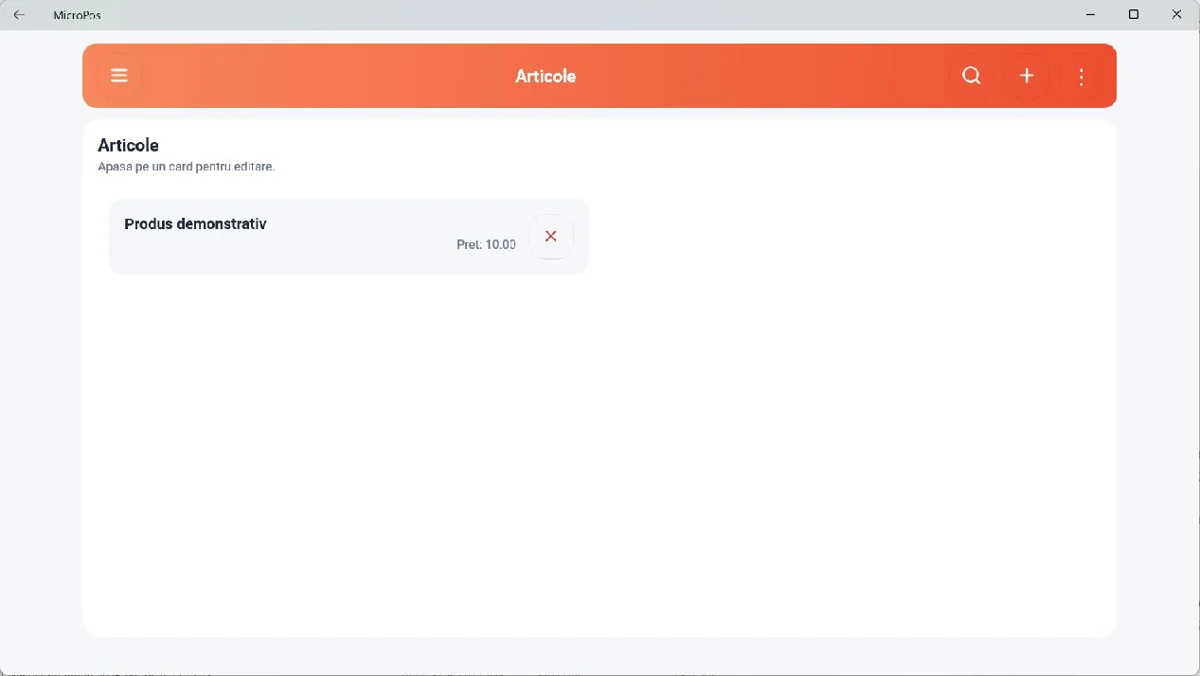
Managing products on Windows
- Open the main menu and go to Administration → Items.
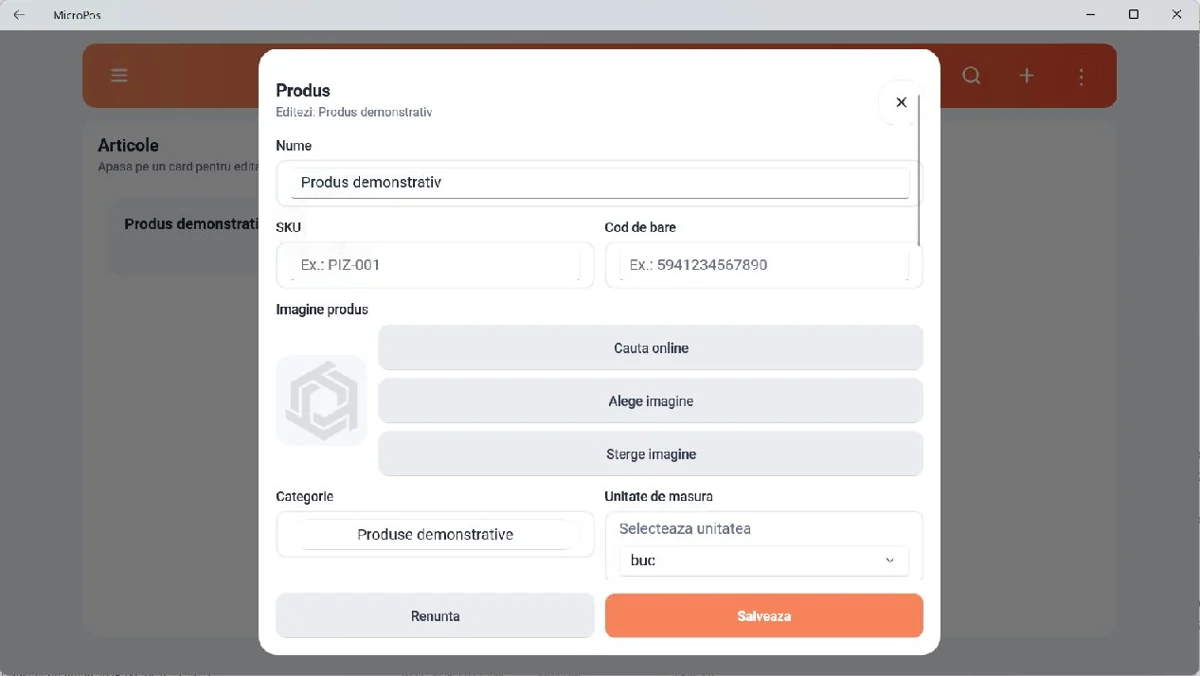
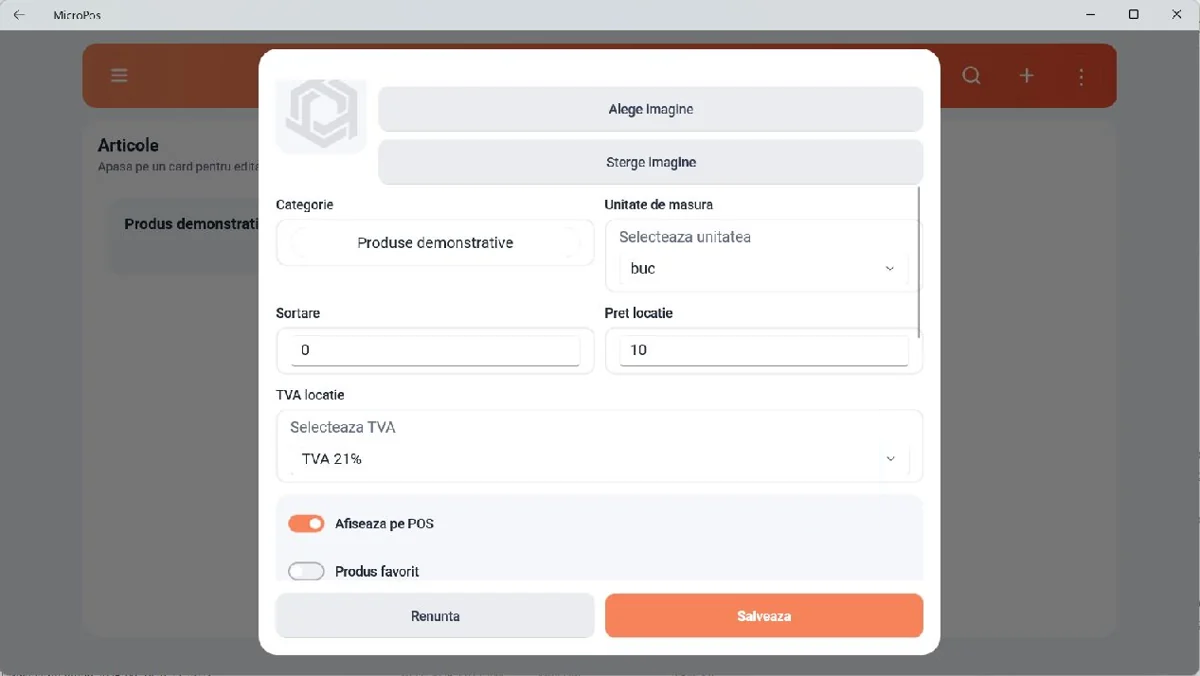
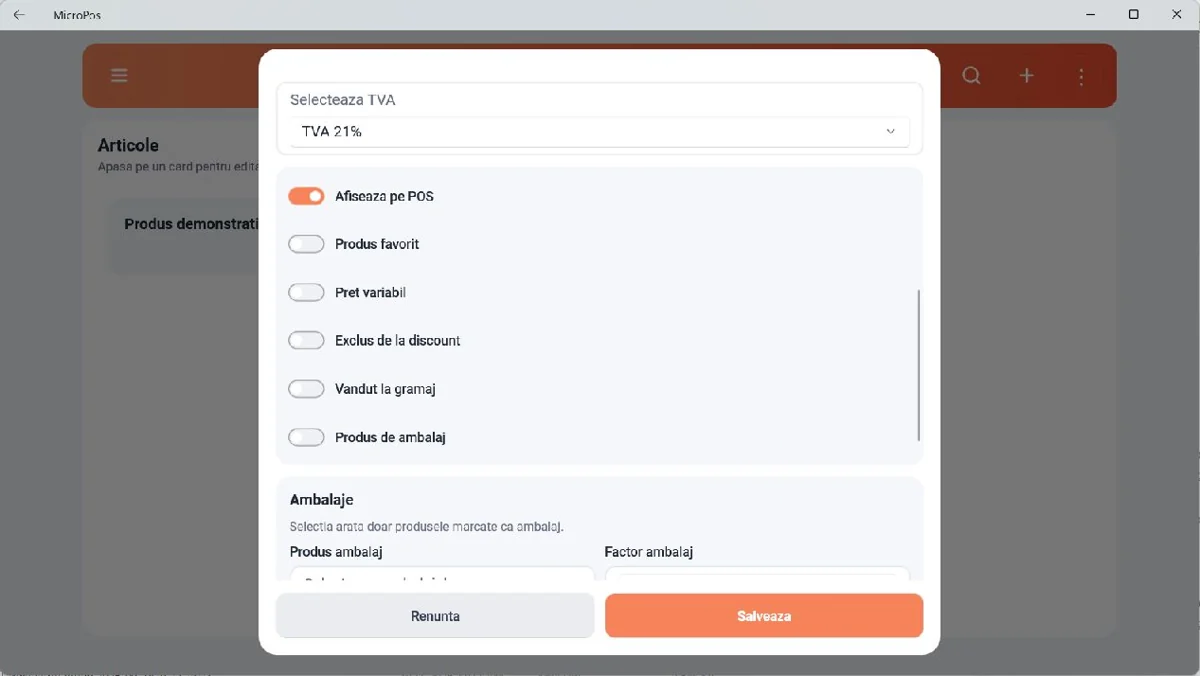
- Open the item to check its general details, category, unit of measure, price and VAT.
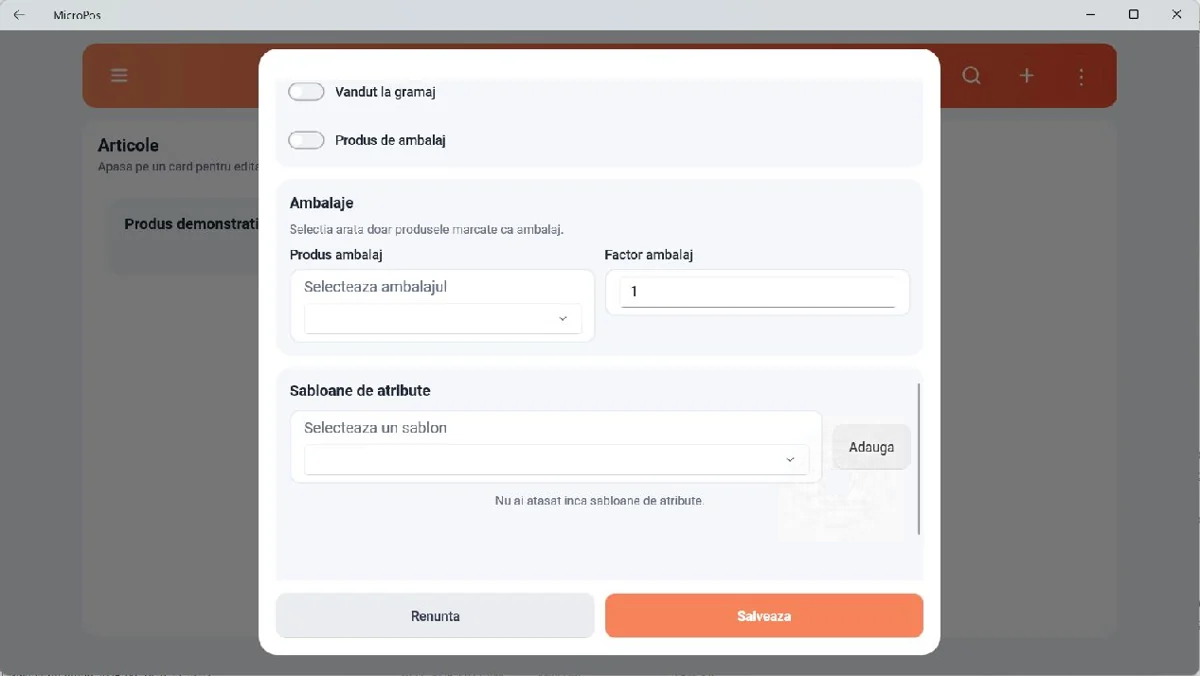
- Scroll through the form to find product options, packaging and the attribute template. Save your changes once the details are correct.
3.5Setting up SGR deposits for products
MicroPOS allows you to associate an SGR packaging item with products to which the 0.50 RON deposit applies.
The configuration is performed in the following order:
Creating the DRS category.
Creating the SGR item and assigning it to the SGR category.
Associating the SGR item with the products to which the deposit applies.
Step 1 – Creating the SGR category
- Open the application menu.
- Go to Administration → Categories.
- Tap the + button to add a category.
- In the Name field, enter SGR.
- Leave the Subcategory option disabled to create a main category.
- Tap Save.
If this category already exists, use the existing category.
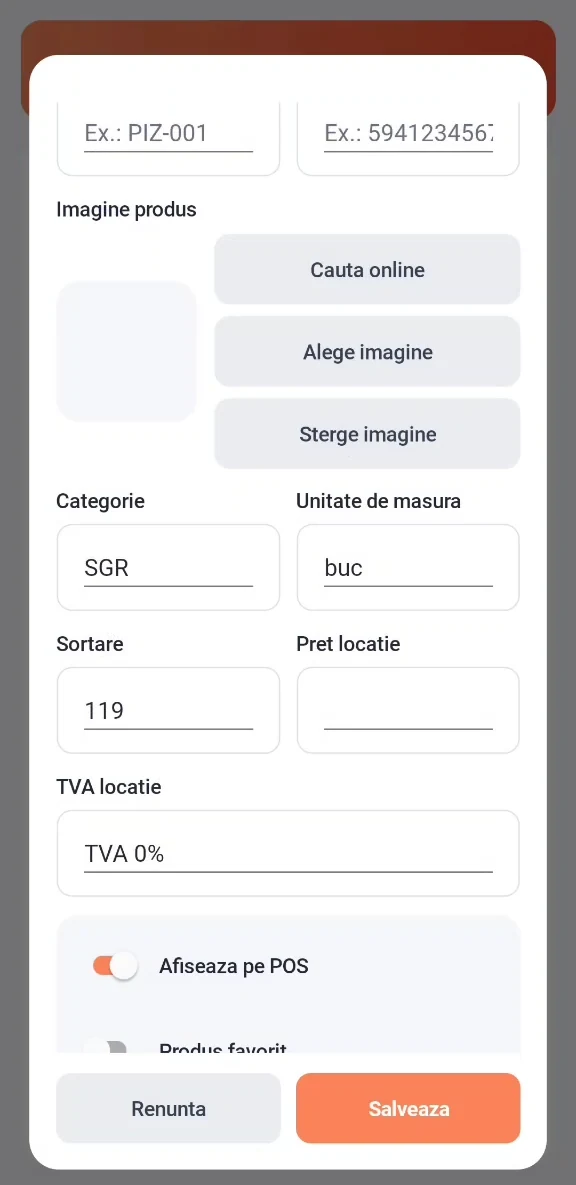
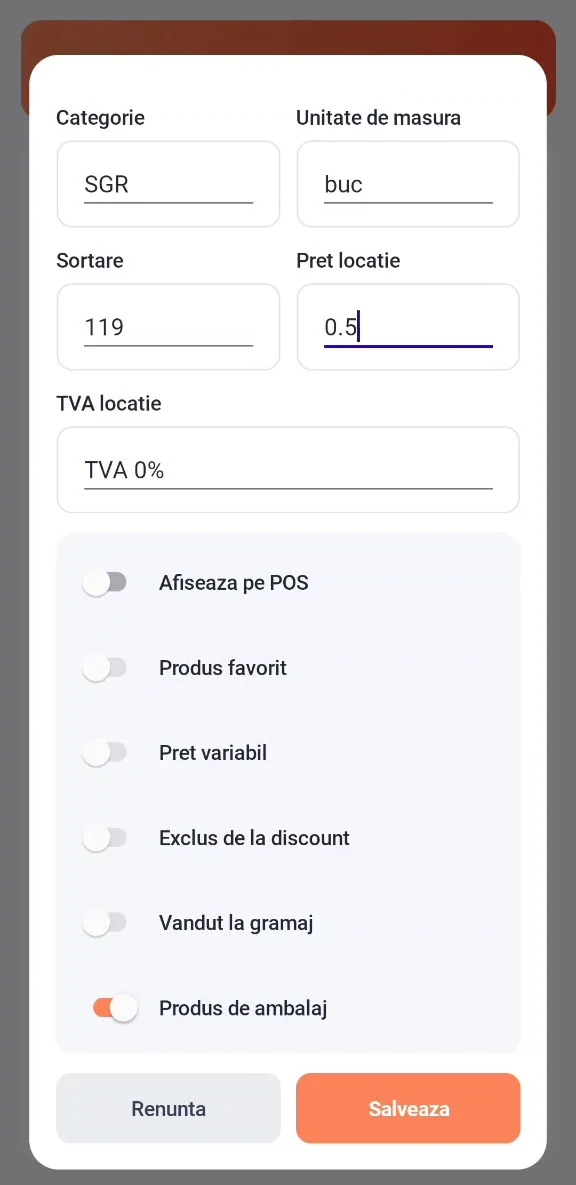
Step 2 – Creating the SGR item
- Go to Administration → Items.
- Tap the + button to add an item.
- In the Name field, enter SGR.
- In the Category field, select SGR, the category created in the previous step.
- Set Unit of Measure to pcs.
- In the Location Price field, enter 0.5, representing 0.50 RON.
- For the configuration shown in the example, set Location VAT to VAT 0%.
- Disable the Show on POS option, as shown in the configuration.
- Enable the Packaging Product option.
- Review the information and tap Save.
Important: Explicitly check the Category field before saving. The SGR item must be classified in the SGR category.
Step 3 – Associating the DRS with a product
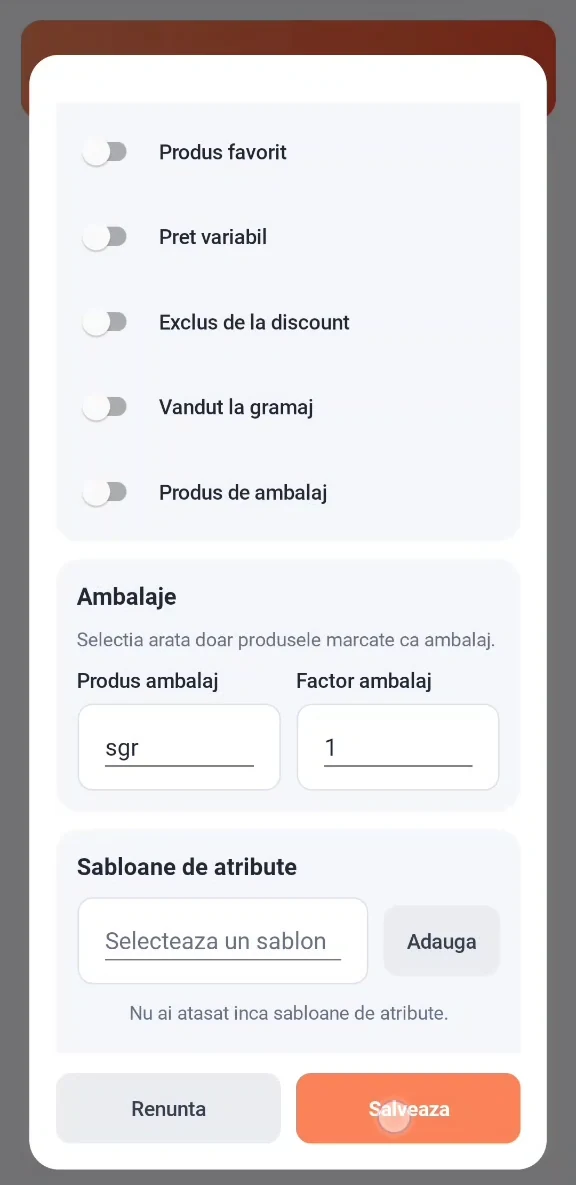
- On the Items screen, search for the product to which the deposit applies.
- Tap the product card to edit.
- Scroll down to the Packaging section.
- In the Produs ambalaj field, select the SGR item.
- Set Packaging Factor to 1 for a product sold by the piece, which corresponds to a single DRS packaging item.
- Tap Save.
- Repeat the association for each product to which the deposit applies.
The product sold retains its own category, for example Cold Beverages. The SGR category is selected for the item that represents the deposit.
The Packaging Product option is enabled for the SGR item. In the record for the product sold, the association is made through the Packaging section.
The Packaging Product list displays only items marked as Packaging Product.
Configuration check
After saving, check:
- the existence of the SGR category;
- the classification of the SGR item within the SGR category;
- the price of 0.50 RON for the SGR item;
- enabling the Packaging Product option for the SGR item;
- the association of the SGR item with the product sold;
- the value 1 in the Packaging Factor field, for a single package per piece.
3.6Setting up attribute templates and variants
Attribute templates allow you to configure groups of options that can be selected when selling a product.
For example, for the product Meniul zilei, separate templates can be associated for:
- soup or broth;
- main course;
- side dish;
- dessert.
Each template contains the options available for that group. By selecting them at the time of sale, the desired combination is created.
The main product has a base price. The options may be included in this price or may carry an additional charge.
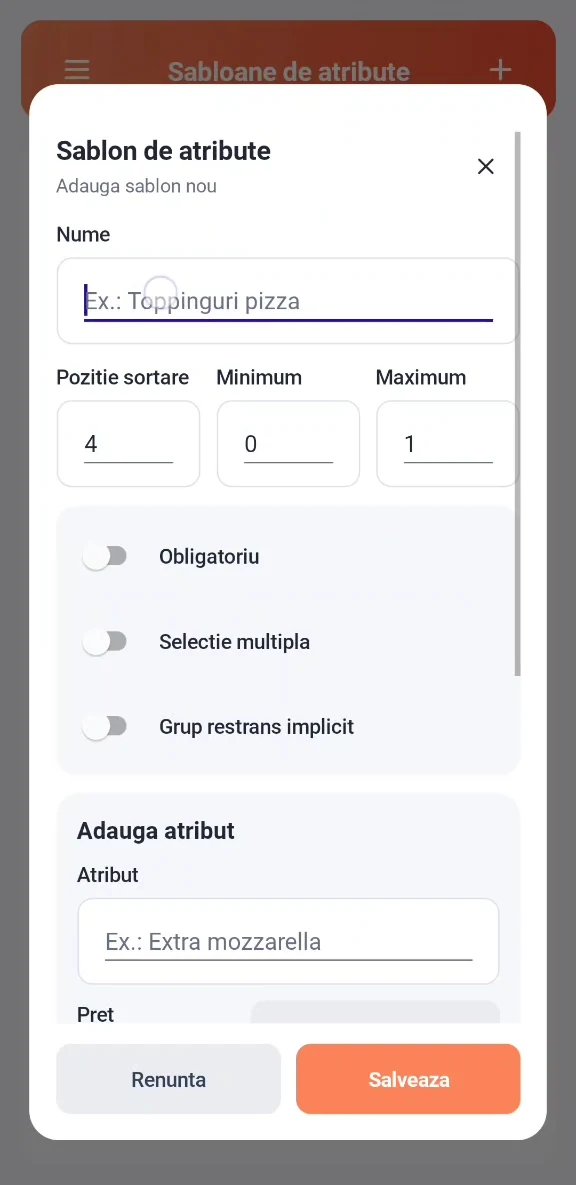
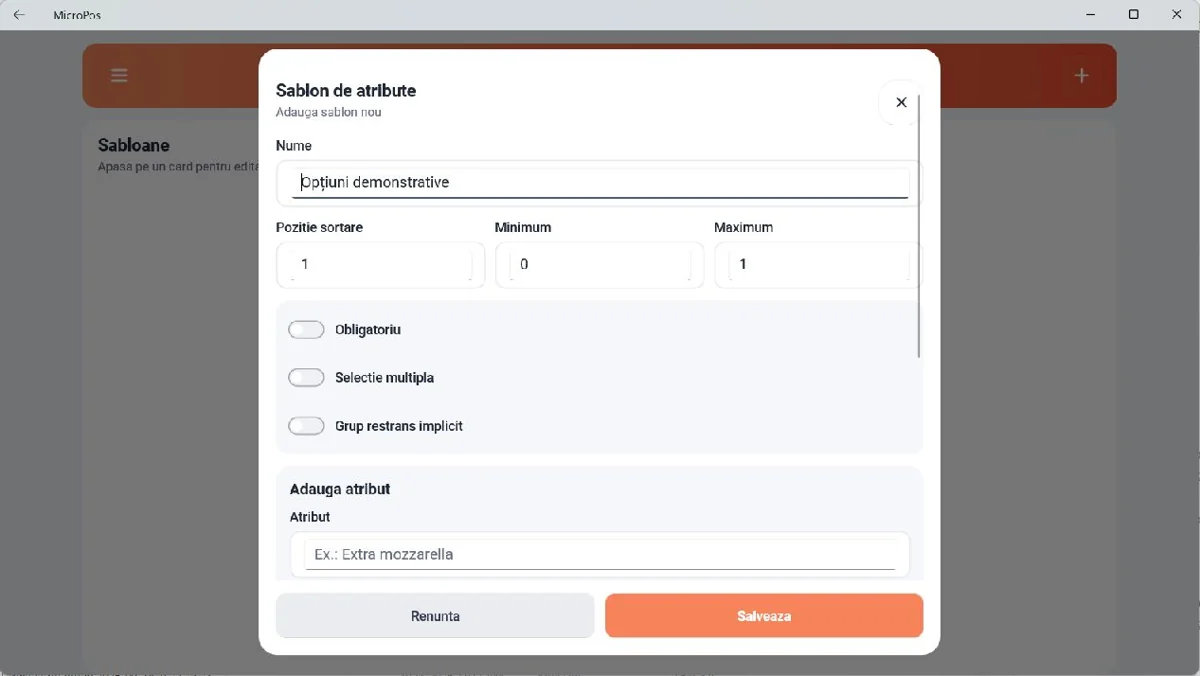
Step 1 – Creating a template
- Open the application menu.
- Go to Administration → Attribute Templates.
- Tap the + button.
- In the Name field, enter a clear name, for example Daily Special - Dessert.
- Configure the selection rules.
- Add the attributes, as described in the next step.
The following fields and options are available in the form:
Sort position – determines the display order of the group.
Minimum and Maximum – set the limits for the number of options selected.
Required – mandates the selection of at least one option from the respective template, while adhering to the configured Minimum and Maximum limits. The rule applies to that template, independently of the other templates associated with the product.
Multiple selection – allows you to choose several options from the same group.
Default collapsed group – sets the initial display of the group in collapsed form.
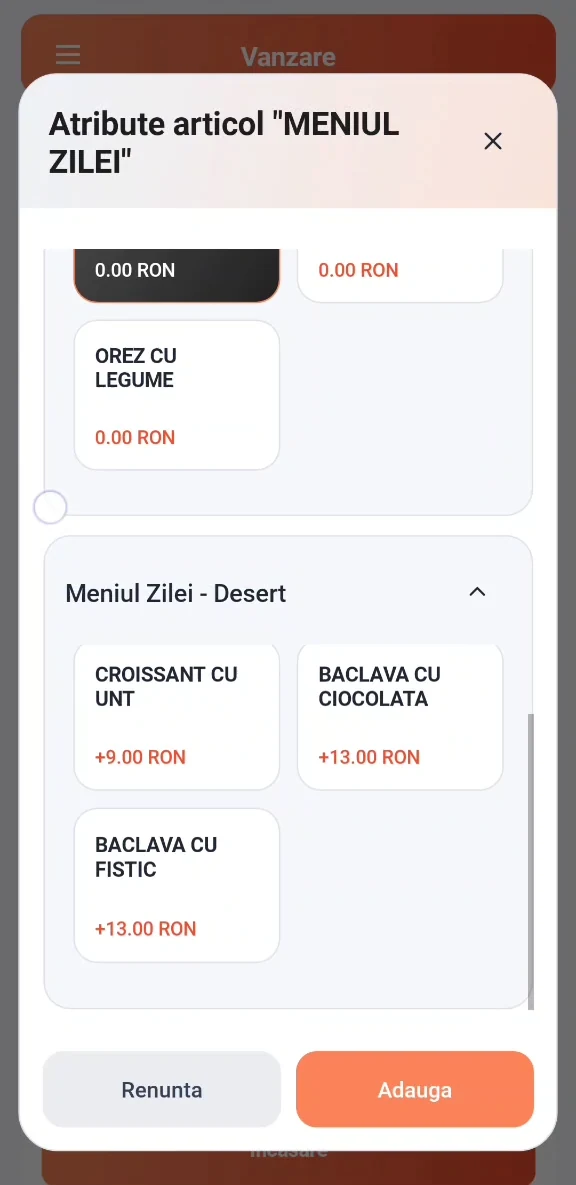
In the dessert example, the template has Minimum 0, Maximum 1, and the Required and Multiple Selection options are disabled. The dessert is therefore optional, and at most one option may be chosen.
Step 2 – Adding attributes
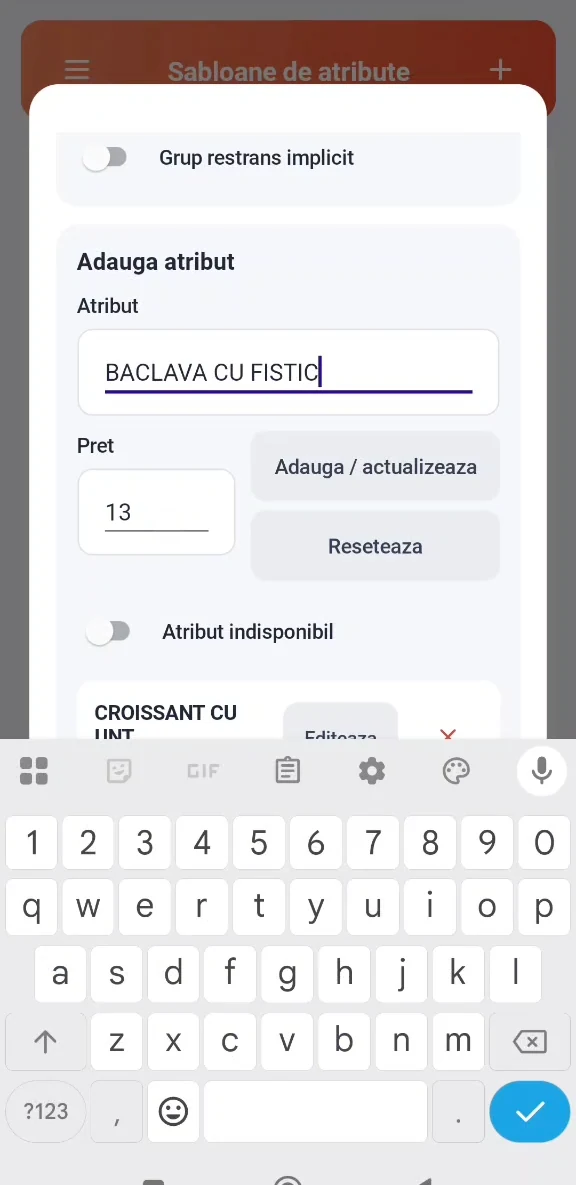
In the Add Attribute section:
- Enter the name of the option in the Attribute field. You can search for an item and select it from the suggestions displayed.
- Check the value in the Price field and enter the amount to be added to the product's base price.
- Tap Add / Update.
- Repeat the operation for the other options.
- Review the list of attributes and click Save to save the template.
To modify an attribute that has already been added, use the Edit button, change the information, and click Add / Update, then save the template.
The form also includes the Attribute unavailable option, for marking an option that is not available.
How to configure prices
The attribute price is the amount added to the base price of the product:
0 RON – the option is included in the base price;
a positive value – the option adds a price supplement.
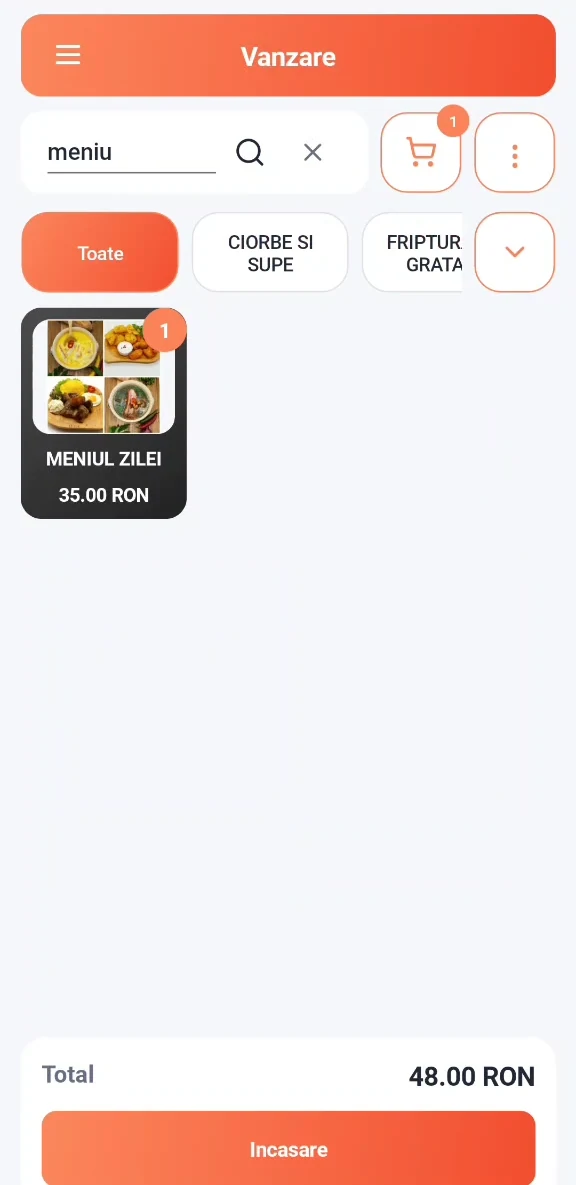
For example, for a menu with a base price of 35 RON:
Choosing a main course and a side dish with an attribute price of 0 RON keeps the price at 35 RON;
The additional selection of a dessert priced at 13 RON results in a total of 48 RON.
Check the price of each attribute after selecting an item from the suggestions. If the option should be included in the menu price, set the attribute price to 0.
Step 3 – Associating the template with the product
- Go to Administration → Items.
- Search for the main product, for example MENIUL ZILEI, and open it for editing.
- Check the base price of the product.
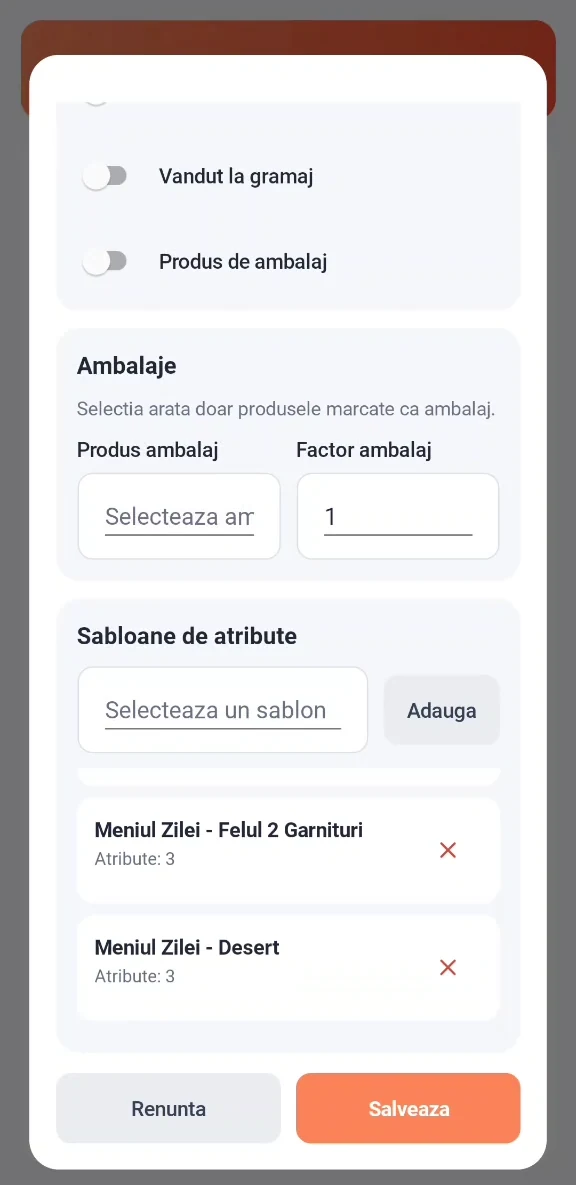
- Scroll down to the Attribute Templates section.
- Tap Select a template and choose the desired template.
- Tap Add to attach it to the product.
- Repeat the operation for the other option groups.
- Check the list of attached templates and tap Save.
The same product can have multiple templates. In the example shown, the product DAILY SPECIAL is associated with groups for soup, main course, side dish, and dessert.
Step 4 – Selecting variants for sale
- Open the Sale screen.
- Search for and select the product.
- In the Item Attributes window, select the desired options from the groups displayed.
- Follow the selection rules configured for each group.
- Check the price surcharges displayed.
- Tap Add.
- Check the total sale amount before taking payment.
The product card displays the base price. The total sale amount also takes into account the selected options.
Configuration check
After configuration, check whether the templates appear when the product is selected, whether the options are correct, and whether the total matches the base price plus the selected surcharges.
04Sales and payments
10 sections
4.1Signing in to MicroPOS
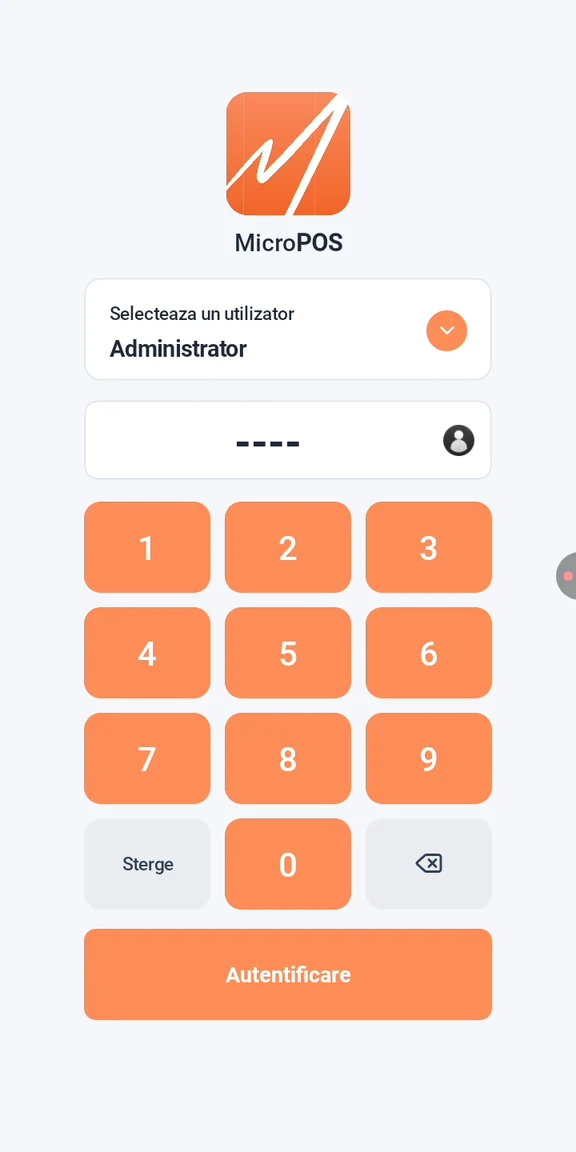
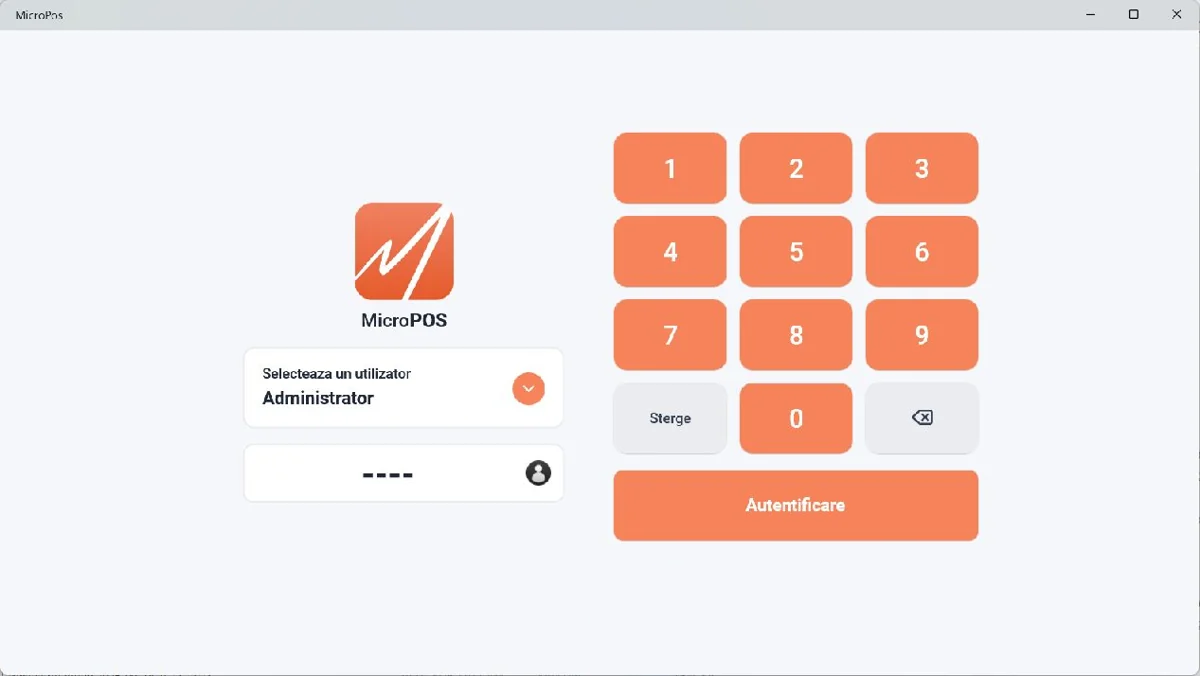
After the initial setup, the user can access the login screen.
The screen may contain:
- the selected user;
- the PIN field;
- numeric keypad;
- the Login button.
Authentication
Select the user.
Enter the PIN, if it is configured.
Tap Log In.
After authentication, the user is directed to the sales interface.
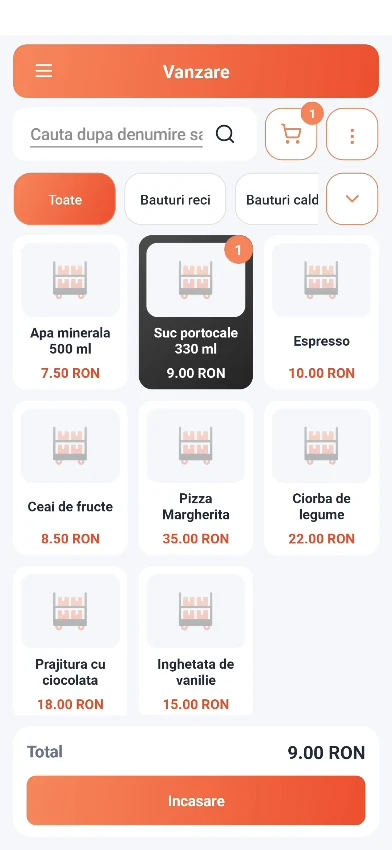
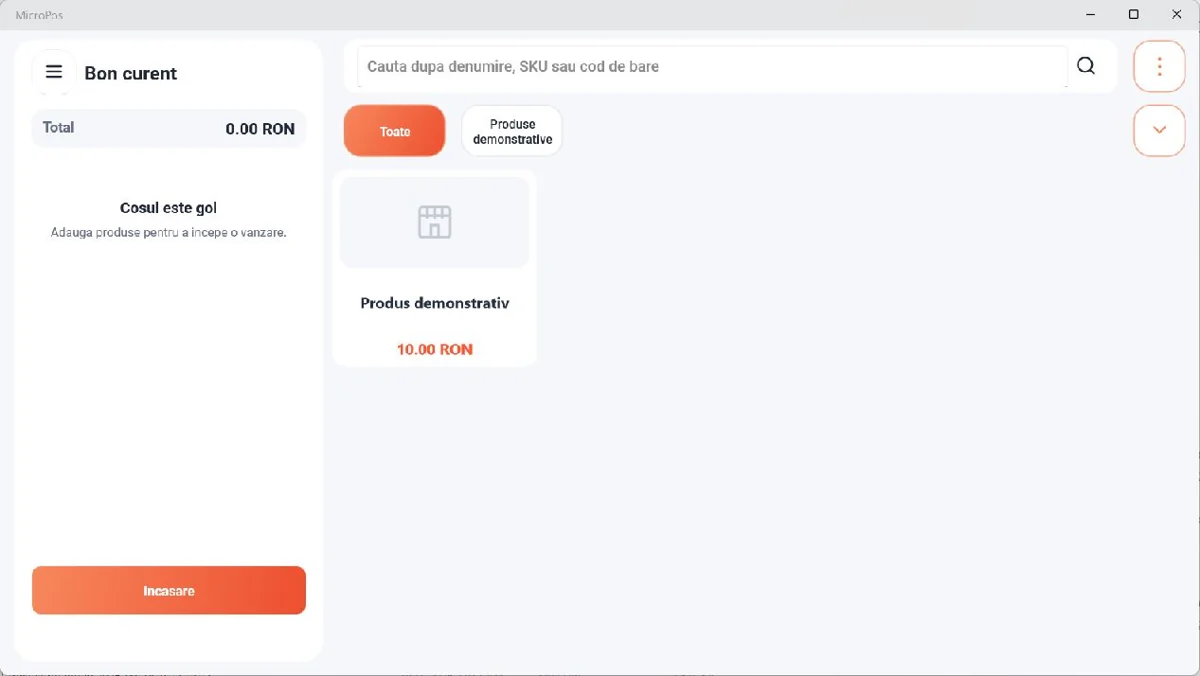
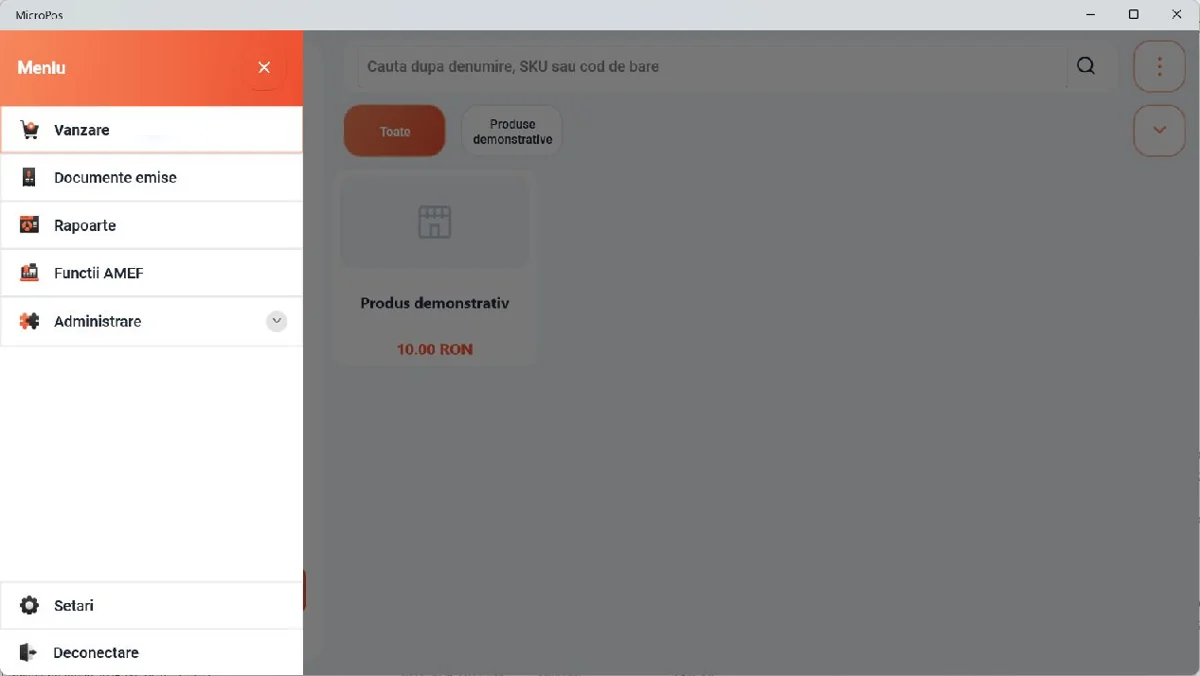
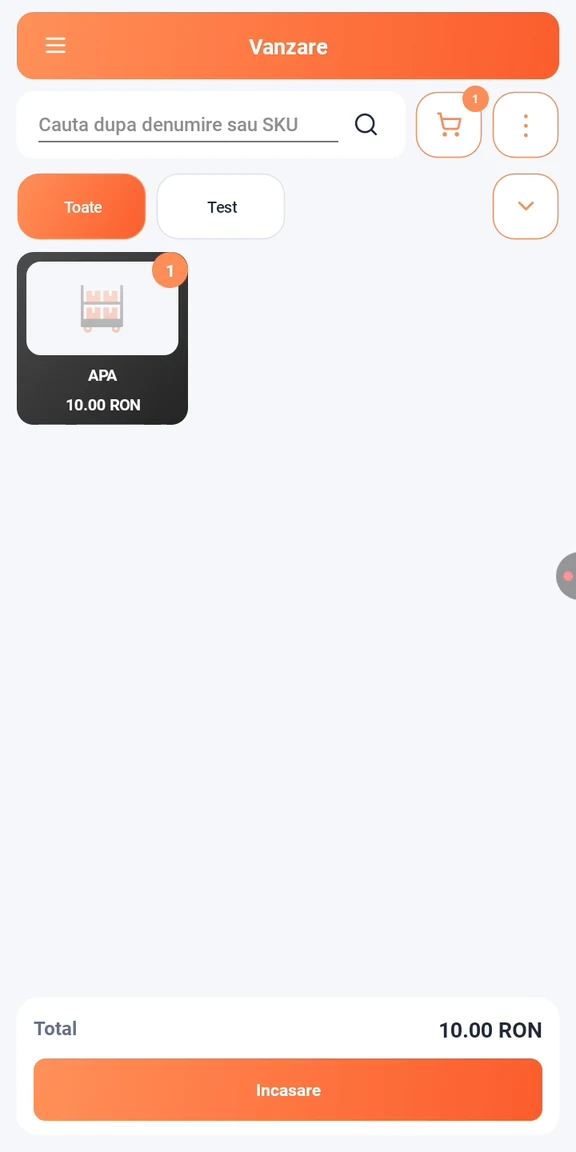
4.2The sales screen
The Sales Screen is the main interface used for making sales.
The application includes elements such as:
- the application menu;
- the Sale title;
- search field;
- product categories;
- products displayed as cards;
- current sale;
- total sales;
- the Checkout button.
4.3Searching for a product
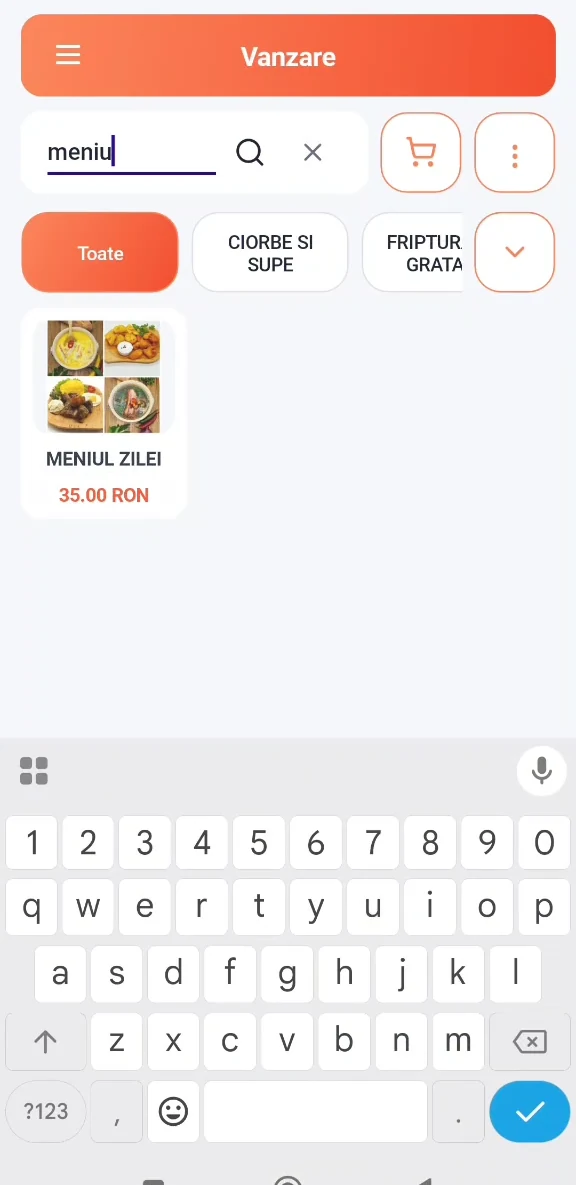
The search field can be used to quickly identify products in the product list.
How to search for a product
Tap the search field.
Enter the product name.
Identify the product in the results.
Select the product.
The product is added to the current sale.
4.4Selecting products by category
Products can be organized by category.
To select a product:
Select the desired category.
Identify the product.
Tap on the product.
The product is added to the sale.
Products are displayed in the interface as cards.
A product card can display:
- product name;
- the product image/icon, if configured;
- price.
4.5The current sale
After selecting a product, it is added to the current sale.
The sales area displays the information relevant to the operation.
Depending on the configuration, the following may be displayed:
- selected products;
- quantities;
- prices;
- value of the products;
- total sales amount.
Before taking payment, the operator must check the products and the total amount.
4.6Taking payment for a sale
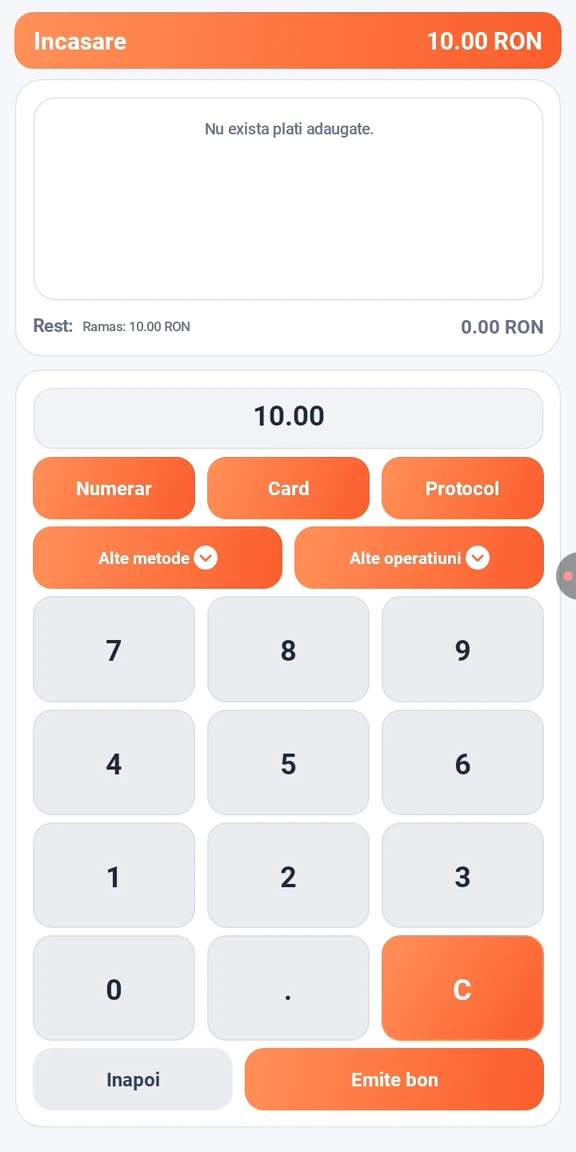
After selecting all products:
Check the products.
Check the total.
Tap Încasare.
Select the available payment method.
Confirm the payment.
MicroPOS transmits the transaction to the fiscal device, according to the configuration.
The fiscal document is issued.
The general flow is:
Products → Total → Payment → Payment Method → Fiscalization → Fiscal Receipt
4.7Payment methods
MicroPOS can support multiple payment methods, depending on the configuration.
The available methods may include:
- cash;
- card;
- meal vouchers;
- modern payment methods.
The payment methods actually available depend on the application configuration, the fiscal device, and the payment solution used.
4.8Taking cash payments
For a sale paid in cash:
Add the products to the sale.
Check the total.
Tap Încasare.
Select Cash.
Enter the amount if the application requests it.
Confirm the operation.
Wait for the fiscalization to be completed.
Check that the receipt has been issued.
4.9Taking card payments
MicroPOS can be used with compatible card payment solutions.
Depending on the configuration, payment can be made:
- via an external payment terminal;
- through an integrated solution;
- via a compatible All-in-One device.
Before implementation, the compatibility between MicroPOS, the fiscal device, and the payment solution must be verified.
4.10Viva Wallet integration
MicroPOS enables integration with Viva Wallet in compatible configurations.
The integration enables card payments to be accepted directly on a compatible Android phone using NFC technology.
The availability of the feature depends on:
- the device used;
- MicroPOS configuration;
- the Viva Wallet solution;
- the services and features available for that configuration.
05Receipts and fiscal operations
9 sections
5.1Issuing a fiscal receipt
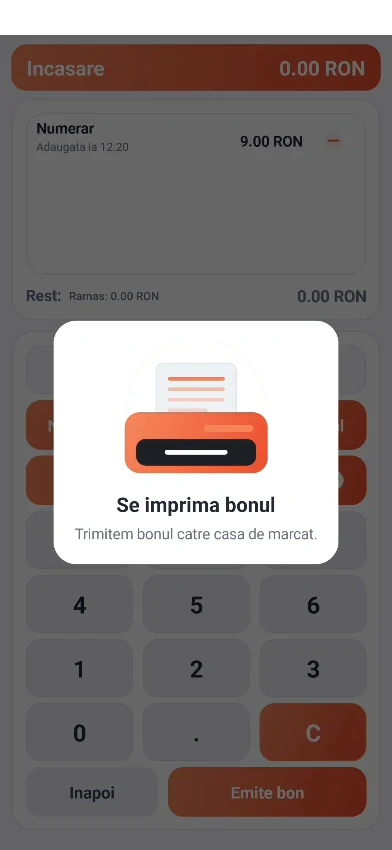
After confirming the payment, MicroPOS transmits the transaction to the configured fiscal device.
During the process, the following message may be displayed:
“Printing the receipt”
The user must wait for the operation to complete before starting a new fiscal operation.
The flow is:
Sale → Payment → Transmission to the fiscal device → Fiscalization → Receipt printing
5.2Receipt printing error
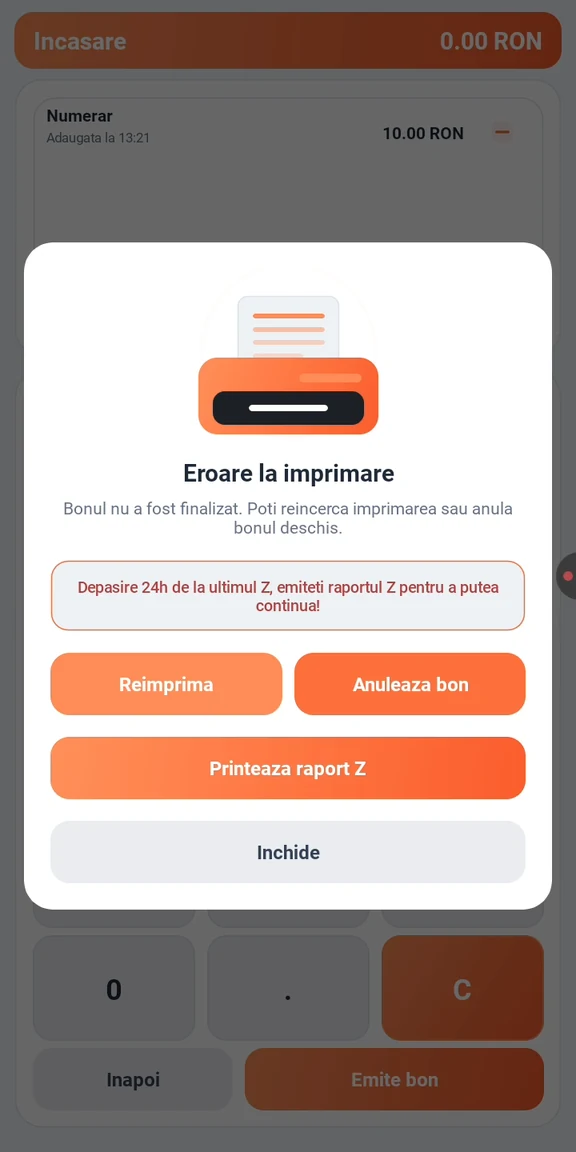
If the receipt does not print correctly, MicroPOS may display a screen of the following type:
"Print error"
The application offers options such as:
Reprint
Void receipt
Print Z report
Close
The available options and their behavior may depend on the status of the fiscal operation.
Important
In the event of a printing error, do not immediately repeat the sale.
First, you must check whether the transaction has already been recorded for tax purposes.
If the receipt has been issued, repeating the sale may result in the recording of an additional transaction.
5.3Reprinting a receipt
MicroPOS allows you to access the history of issued receipts and, in compatible configurations, to reprint a receipt.
General flow
Access the receipt history.
Identify the receipt.
Open the receipt.
Select the reprint/reissue option.
Confirm the operation.
Check the printing of the document.
5.4Receipt history
The receipt history allows you to view documents issued through MicroPOS.
It can be used for:
- verifying a sale;
- identifying a receipt;
- verifying the transactions issued;
- reprinting a receipt;
- verification of sales activity.
The history is also a useful tool for verifying a transaction in the event of a printing issue.
5.5Fiscal reports
MicroPOS allows access to AMEF fiscal reports from within the application.
Depending on the configuration, the following are available:
- Report X;
- Z Report;
- cash deposit;
- cash withdrawal.
5.6X report
The X Report can be generated directly from MicroPOS in compatible configurations.
How to generate the X Report
Go to the fiscal reports menu.
Select Raport X.
Check the operation.
Confirm the generation of the report.
MicroPOS sends the command to the fiscal device.
The X Report is used to check the fiscal status without closing the fiscal day.
5.7Z report
The Z Report is a fiscal operation used to close the fiscal day.
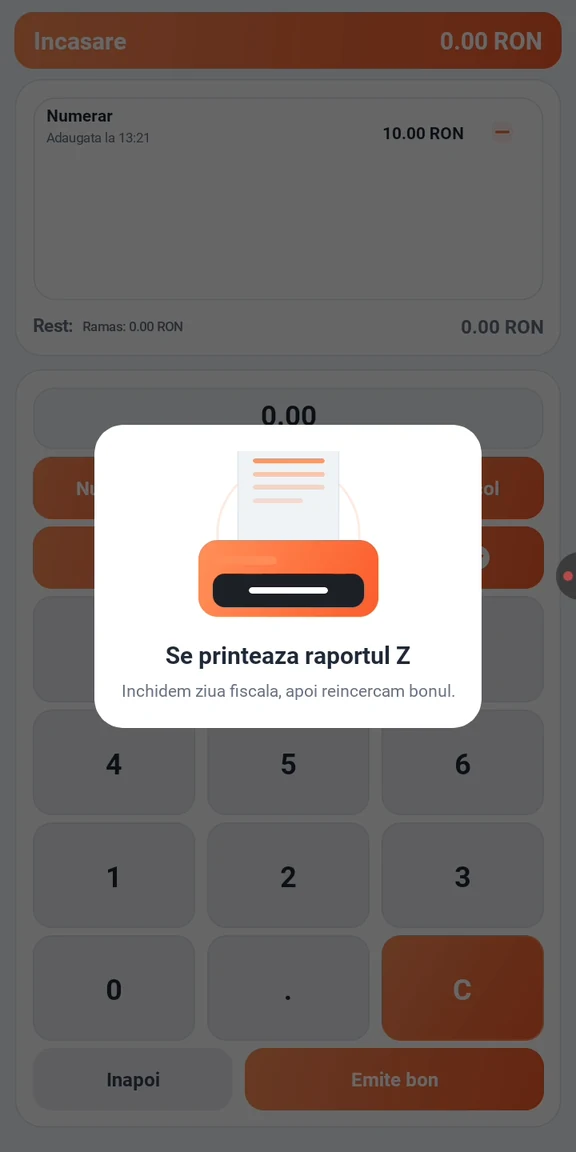
The following message may appear in the MicroPOS interface:
"Printing Report Z"
The application may indicate that the Z report closes the fiscal day.
Generating the Z Report
Go to the fiscal reports menu.
Select Z Report.
Check the operation.
Confirm generation.
MicroPOS sends the command to the fiscal device.
Wait for the report to print.
The Z Report must not be generated accidentally, as the operation has a fiscal effect on the business day.
5.8Adding cash
MicroPOS allows cash deposit operations to be performed in compatible fiscal configurations.
General flow
Access fiscal operations.
Select Cash Deposit.
Enter the amount.
Verify the amount.
Confirm the operation.
MicroPOS transmits the transaction to the fiscal device.
5.9Withdrawing cash
MicroPOS allows cash withdrawal operations to be performed in compatible fiscal configurations.
General flow
Access fiscal operations.
Select Cash Withdrawal.
Enter the amount.
Verify the amount.
Confirm the operation.
MicroPOS transmits the transaction to the fiscal device.
06Connection and troubleshooting
7 sections
6.1Offline operation
MicroPOS can operate without an internet connection in compatible scenarios.
This functionality is useful for:
- street vendors;
- mobile activities;
- locations with unstable internet;
- points of sale where internet access is not always available.
Offline operation must be considered separately from functionalities that depend on external services.
For example, certain online integrations or payment services may require connectivity.
6.2Setting up an external cash register
For the configuration:
Android + MicroPOS + external cash register
The following steps are recommended:
Identify the exact model of the cash register.
Check whether the model is compatible.
Check the available connection method.
Turn on the cash register.
Configure the connection.
Link the device to MicroPOS.
Check the communication.
Perform a test sale.
Check the issuance of the fiscal document.
6.3Setting up an All-in-One fiscal device
For the All-in-One configuration:
Identify the equipment model.
Check the available features.
Turn on the equipment.
Open MicroPOS.
Configure the company.
Configure users.
Configure the nomenclature.
Check the integrated fiscal module.
Configure the available payment methods.
Perform a test sale.
Check the issuance of the fiscal receipt.
In this scenario, it is not necessary to connect an external cash register when the fiscal function is integrated into the equipment.
6.4Checking communication with the cash register
If MicroPOS is not communicating with the fiscal device, check the following:
The cash register is turned on.
The Android device or Windows computer is switched on.
Bluetooth or the connection method used is active.
The device is available for communication.
The model selected in MicroPOS matches the physical device.
The connection between the devices is active.
The cash register is not currently engaged in another operation.
There is no error message on the fiscal device.
6.5Bluetooth problems — Android
If the fiscal device does not appear in the list of devices:
Check:
- Bluetooth is active;
- Android permissions have been granted;
- the cash register is turned on;
- the device is close enough;
- the device is not already connected to another piece of equipment;
- the model selected in MicroPOS is correct.
If the problem persists, restart the Bluetooth connection and search for devices again.
6.6The fiscal receipt does not print
If the receipt is not printed:
Do not repeat the sale immediately.
Check whether the transaction has been fiscalized.
Check the status of the cash register.
Check the paper and the printer.
Check the connection between MicroPOS and the cash register.
Check the receipt history.
If the receipt exists in the history, use the reprint/relist function, if available.
6.7Printing error
When MicroPOS displays “Print Error,” check:
- whether the fiscal device is turned on;
- whether there is paper;
- whether the printer is available;
- whether there is a connection to MicroPOS;
- whether the transaction has already been fiscalized.
Do not process the sale again until the status of the initial transaction has been clarified.
07License and Activation
2 sections
7.1The MicroPOS licence
MicroPOS can display information about the application's license.
Depending on the situation, the following may be displayed:
- tax identification number;
- license status;
- period of validity;
- expiration date;
- last check;
- device information;
- device identifier;
- the distributor.
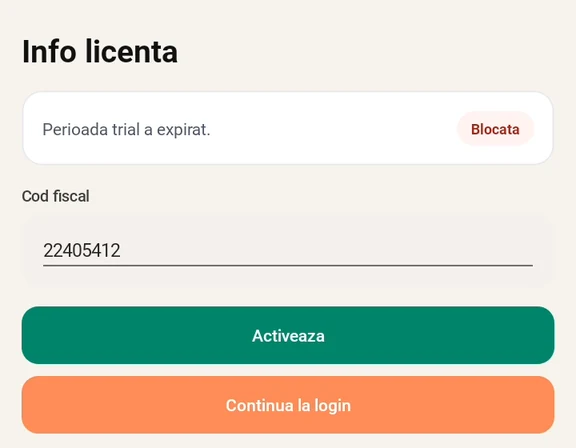
If the trial/license period expires, the application may display a screen with an expiration message and the following option:
Activate
7.2Activating the licence
If the license has expired, the user must follow the activation procedure provided by the supplier/distributor.
The license screen may contain information needed to identify the installation.
For support, it is recommended to provide:
- tax code;
- the device identifier;
- the message displayed;
- license information.
08Workflows and support
5 sections
8.1The complete implementation workflow
The implementation of MicroPOS can be structured into the following stages:
Step 1 – Identifying the configuration
Determine whether the project uses:
Android + external cash register
or
All-in-One fiscal device
The exact model of the fiscal device is identified.
Step 2 – Opening MicroPOS
Open the application on your Android or Windows device.
Verify that the application starts and functions properly.
Step 3 – Company Setup
Enter the CUI and verify the company information.
Step 4 – Configuring the fiscal device
Select the cash register and configure the communication method.
Step 5 – User Configuration
The first manager is created, and, if necessary, the PIN is configured.
Step 6 – Product Configuration
Products can be:
imported from Excel;
entered manually.
The following are configured:
- categories;
- products;
- prices;
- VAT;
- units of measurement.
For products to which the SGR guarantee applies, first create the SGR category, then create the SGR item within this category and mark it as a packaging product. The item is associated with each product concerned, in accordance with Section 3.5.
Step 7 – Configuring payment methods
The payment collection methods available for the project are configured.
Step 8 – Fiscalization testing
A test sale is performed.
The following are checked:
- product selection;
- total;
- payment method;
- communication with the fiscal device;
- fiscalization;
- printing the receipt.
Step 9 – Testing special scenarios
Depending on the project, the following are tested:
- offline operation;
- X report;
- Z report;
- cash deposit;
- cash withdrawal;
- receipt history;
- reprinting of receipts;
- payment methods;
- reconnecting the fiscal device.
8.2The complete sales workflow
The standard flow is:
1. Authentication
↓
2. Opening the Sale screen
↓
3. Selecting the category
↓
4. Product selection
↓
5. Reviewing the sale
↓
6. Verifying the total
↓
7. Pressing the Checkout button
↓
8. Selecting the payment method
↓
9. Payment confirmation
↓
10. Transmitting the transaction to the fiscal device
↓
11. Fiscalization
↓
12. Printing the fiscal receipt
↓
13. Completion of the sale
8.3Information needed for support
To enable the support team to quickly identify an issue, the user should provide, to the extent possible:
- Android device model;
- Android version;
- the exact model of the cash register;
- connection method;
- payment method used;
- description of the problem;
- error message;
- the operation during which the problem occurred;
- whether the problem occurs permanently or occasionally.
If the issue is displayed in the application, it is also recommended to submit a screenshot.
8.4MicroPOS architecture
Depending on the configuration, MicroPOS can be used in two main architectures.
Android + external cash register
Android device
↓
MicroPOS
↓
Fiscal device
In this configuration, MicroPOS runs on a phone or tablet and communicates with the external cash register using the connection method compatible with the device.
All-in-One
All-in-One fiscal device
↓
Android + MicroPOS + Integrated fiscal module
In this configuration, the components required for sales and fiscalization are integrated into the same device.
8.5Usage recommendations
For proper operation:
- verify the exact model of the fiscal device before configuration;
- keep the Android device charged;
- periodically check the connection to the fiscal device;
- check that there is paper in the printer;
- do not repeat a sale if it is not clear whether the first transaction was fiscalized;
- check the receipt history when a printing error occurs;
- perform the Z report only when it is necessary to close the fiscal day;
- retain the device configuration information for any support requests.
No sections match your search. Try another term or contact support.